Project Data And Information Management Software That's Made For Non-experts & Only Costs $20 (CAD)
This software is a Project Data & Information Management System that anyone can use to keep any kind of project's information organized, trackable, and extremely easy to retrieve.
To organize and track any project's data the software automatically builds and operates for you, sets of databases and database records. You don't need to know anything about database design/programming to use these databases because the software takes care of all of that for you in the background. You simply tell the software what you want done, or tracked, and it takes care of how the databases get that job done for you.
99% of the time running this software just involves clicking on a hyperlink to activate a database task, and then you enter some information into a couple of fields in a record, or you scan a list of records for one that you're looking for.
If you can type at any speed, know how to run a mouse, and know that when you click on a hyperlink something happens, then you're good to go.
The Software Can Track, Organize, And Retrieve Any Kind Of Data Source
The software makes it incredibly fast and easy to get any kind of data into and out of the databases so they can organize, track, and retrieve that data for you when you need it. Like every type of software database system, the databases can only directly work with data stored in their database records, note records, and computer files that are linked to database records.
But, a lot of project related data is stored in non-digital data sources, such as data on paper, on whiteboards, ideas in your head, conversations, etc. This kind of data can easily be tracked and organized by the software too, but first you'll have to convert it from its current non-digital format to digital data stored in a computer file, and the easiest way to do this is to just use the built in 'apps' on your smart phone.
For example, to capture and track paper based data, or the contents of a whiteboard, use your smart phone's camera app to photograph that data. Now that non-digital data exists in a "trackable" digital format as a computer file on the phone and a copy of that file can easily be linked to one or more related database records.
The linking process usually takes less than 30 seconds to perform and it'll make a copy of the file, ask you for a description of the file's contents, capture the file's name and complete address, and then link all of this data to the set of database records the file's contents are related to.
Then in the future when you need to open that file and work with its contents all you're going to need is a simple keyword search to find it. Your keywords can be whatever vague memories you have about the file's contents, and never have to be anything about the file's name or location on a storage device.

99% of the time, your keyword search will locate the file you're looking for in under 30 seconds. Then you just double click anywhere on that file's entry in the search list and the software that works with that type of data loads and displays the files contents to you. It's that simple.
Creating A Project Management Database System Is Simple
1. Click the New Project hyperlink found on the left hand side of the Projects Index window. It's the first window you see when you start the software.

2. A project record is displayed in a new window. Give the new record a proper title and description.
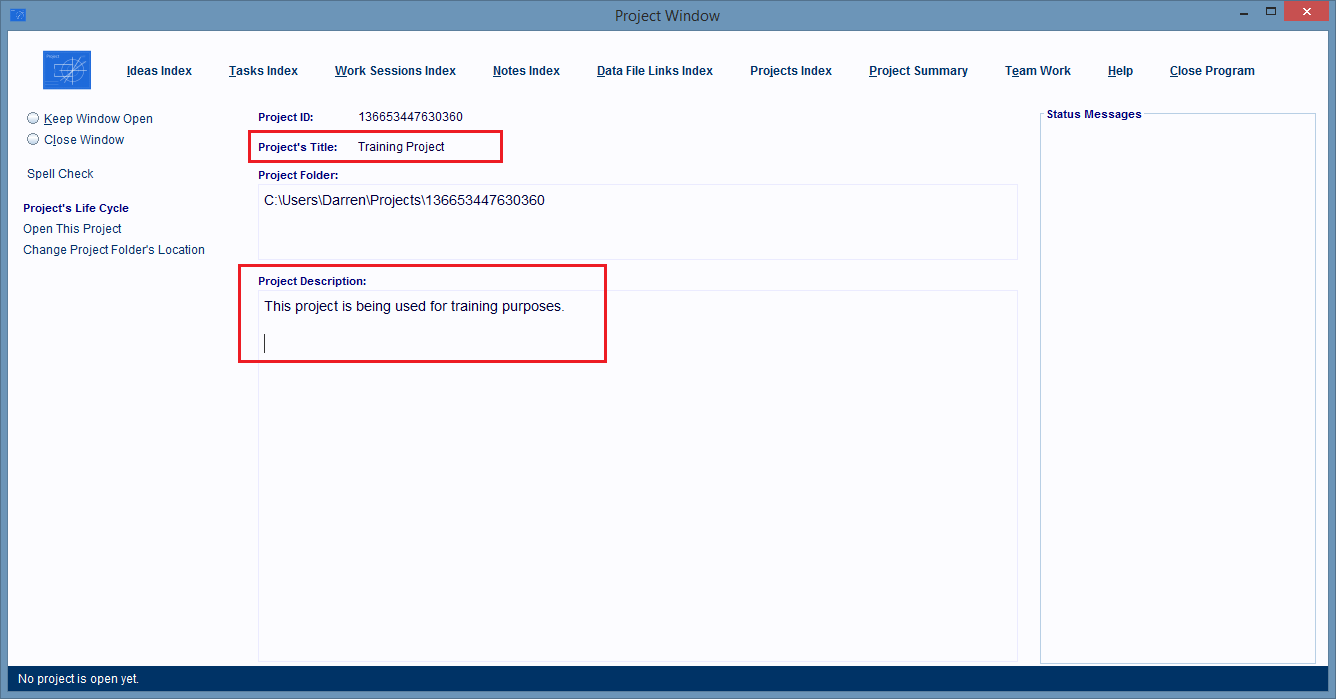
3. Now to create and start the databases, click on the Open This Project hyperlink found on the left hand side of the Project window.
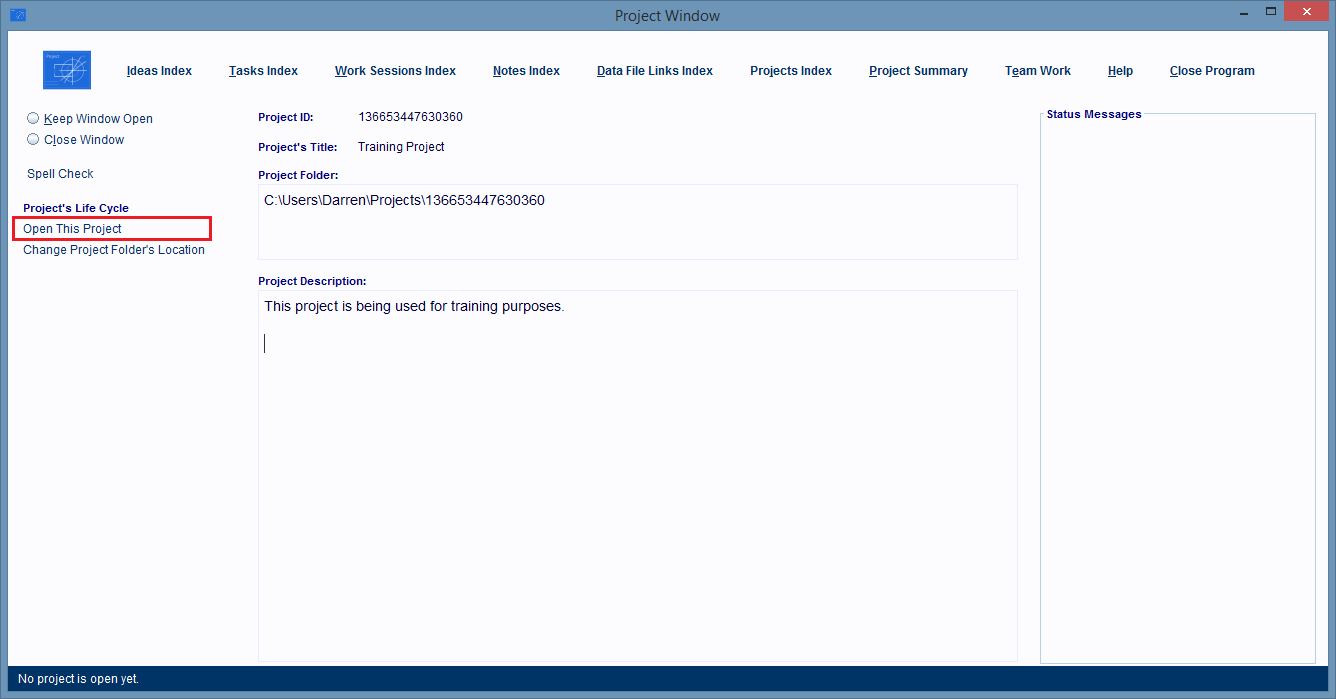
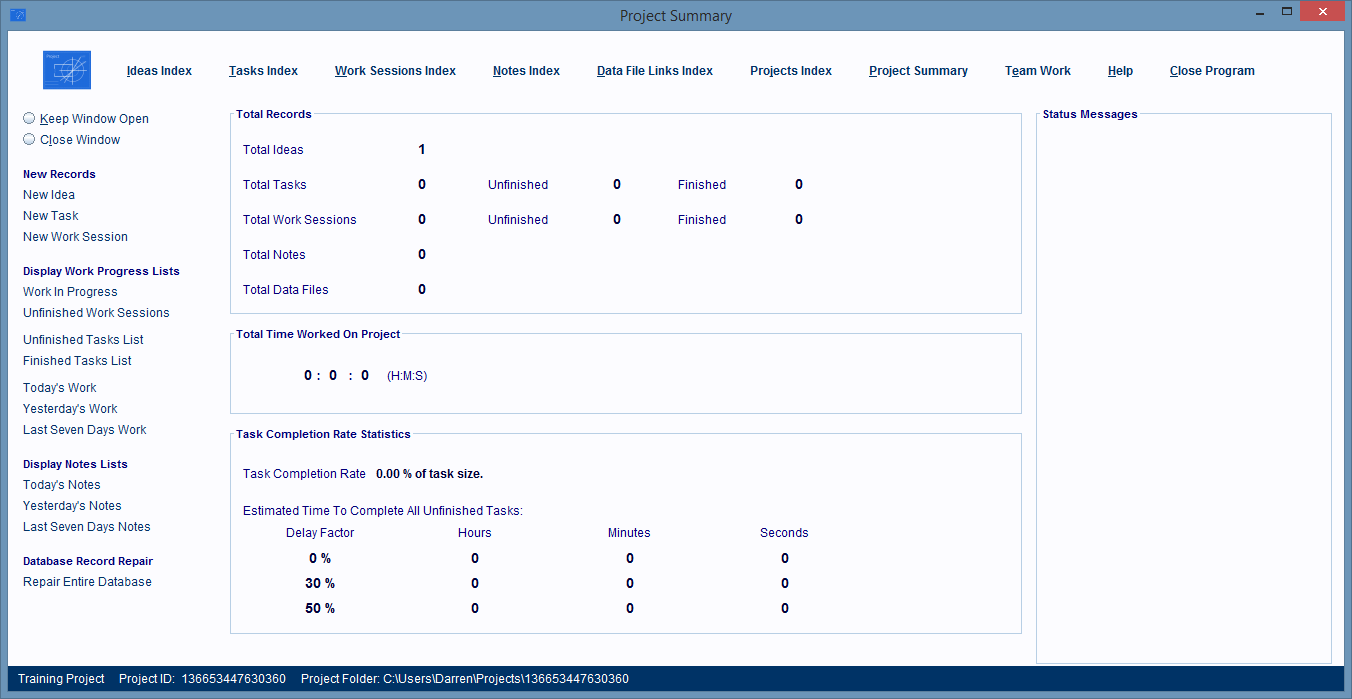
4. In a couple of seconds you'll see a new window, the Project Summary Window and that means your databases are up and running and ready to go to work.
As you can see, all it takes to build and start an entire Project Data Management System is to just click on hyperlinks and type some information into record fields. Building and running database systems doesn't get much easier than that.
Creating Database Records Is A Simple 2 Step Process
Before a database can help you organize a project's information and/or project elements a database record that will represent that information or project element has to be created first.
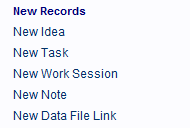
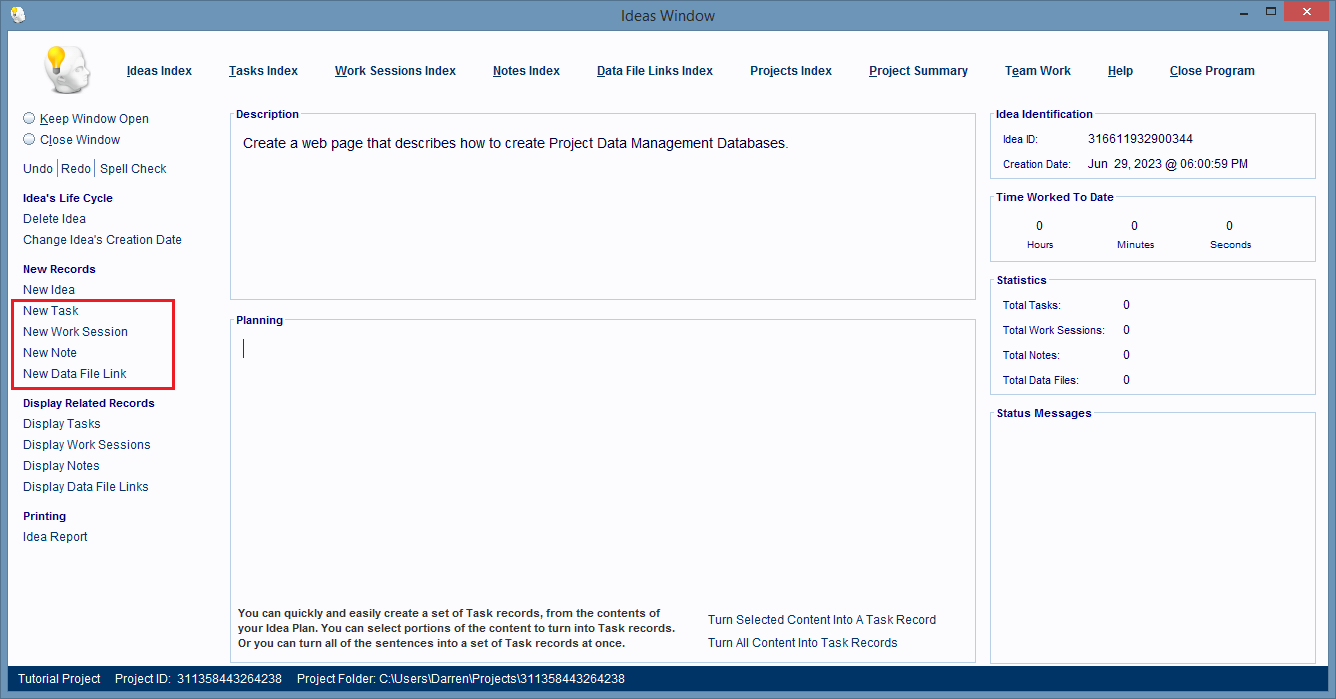
1. To ask the software to create a database record all you do is click on a hyperlink whose name starts with the word New, such as New Idea, New Task, New Data File Link, etc.
2. After you click the hyperlink a database record is created and displayed to you in a new window. When you see it, you type a description for it in its Description field and your done.
If you need to create another database record that's related to this one, then just click the appropriate New... hyperlink on the left hand side of the window, and the process repeats itself.
Every time you create a new record, the software knows exactly which record group the new record belongs to, and has already linked it to all the records in that group that it needs to be linked to.
Creating Record Groups
The majority of a project's information is related to the development of the project's ideas. This software uses that concept to organize your information.
It makes you create an Idea record to represent an idea that's being developed. Then, when you need them, database records are created for anything involved in developing that idea. When these records are created they're linked to the Idea record whose idea they're helping to develop.
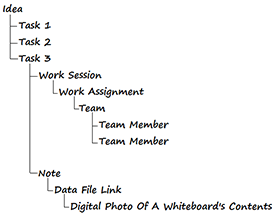
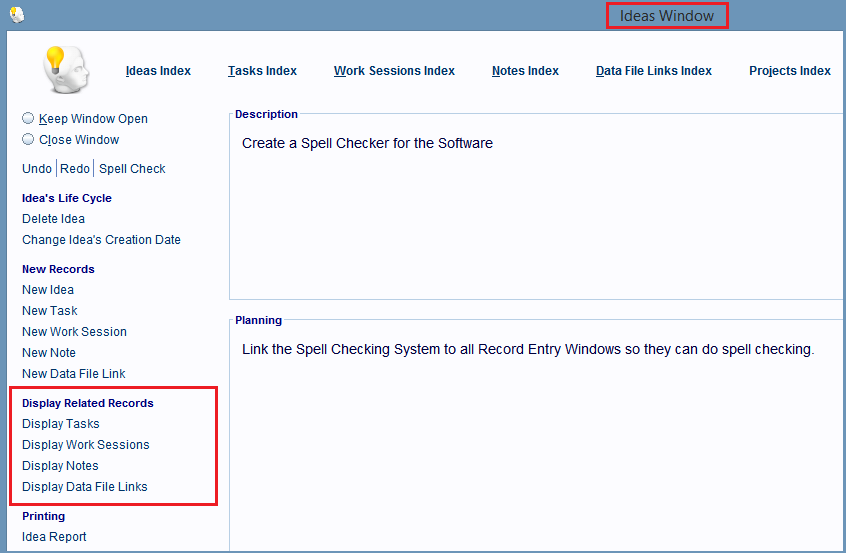
This image is an Idea record that's linked to a large number of support records.
The result of this linking process is that you end up with a hierarchically ordered record group, with a single Idea record tracking everything inside that group.
You also end up with an extremely easy way to find records and computer files whose locations you don't remember.
If you think what you're looking for is related to some Idea record, then just ask the Idea record if it's linked to it.
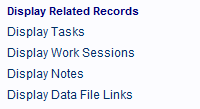
To do this just click the appropriate Display... hyperlink, such as the Display Data File Links hyperlink to see a list of all the computer files linked to the idea.
A Really Quick Way To Create An Idea Record And An initial Set Of Task Records For It
Normally, you create a new record only when you need it, but you'll often find that when you create an Idea record, you already have an initial set of tasks for that idea that you want to create records for too. So, I'm going to show you a really fast and simple way to create these records.
Creating The Idea Record
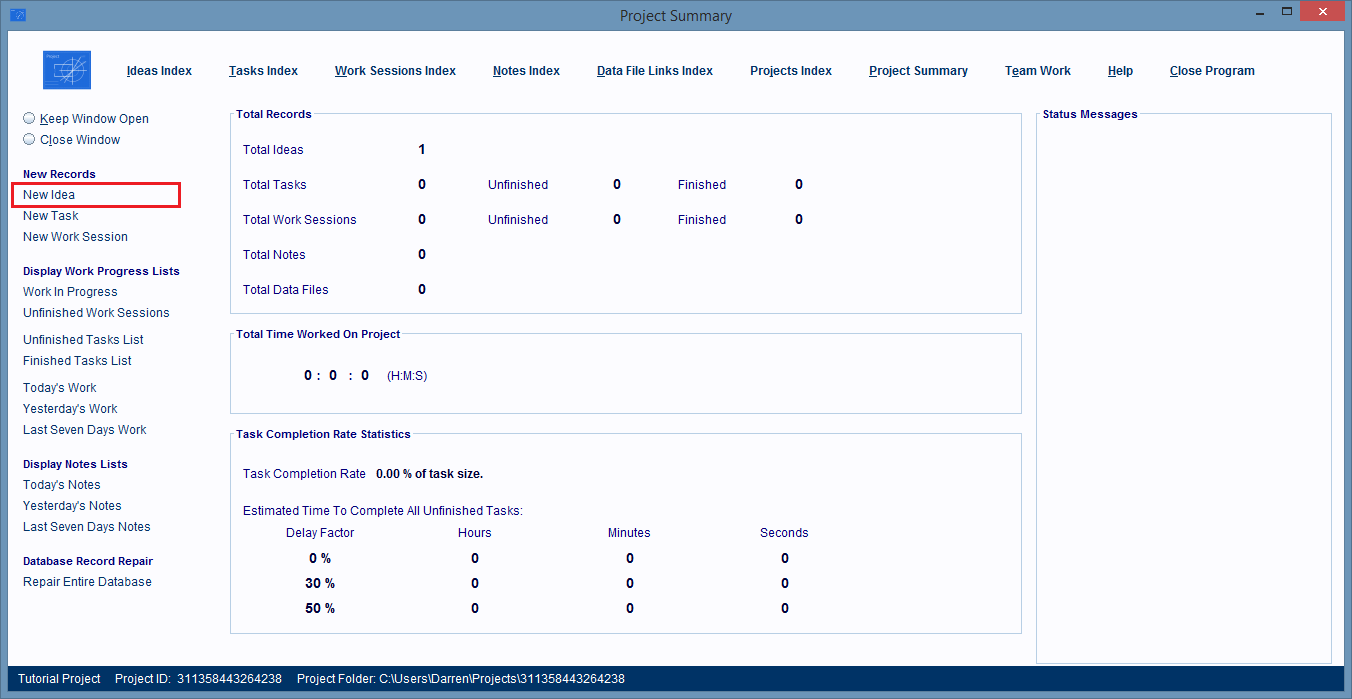
1. To create an Idea record just click on the New Idea hyperlink in any window that displays it.
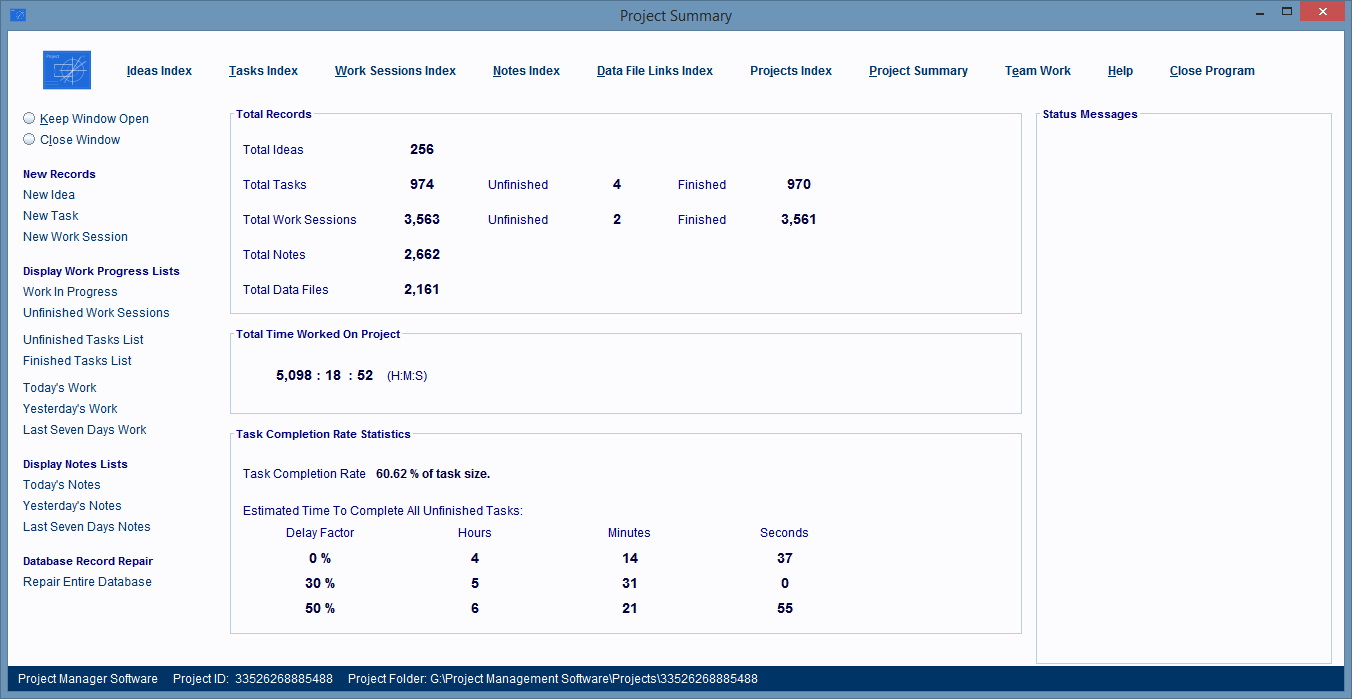
When a project is opened the first window you see is the Project Summary window (below) and it has a New Idea hyperlink.
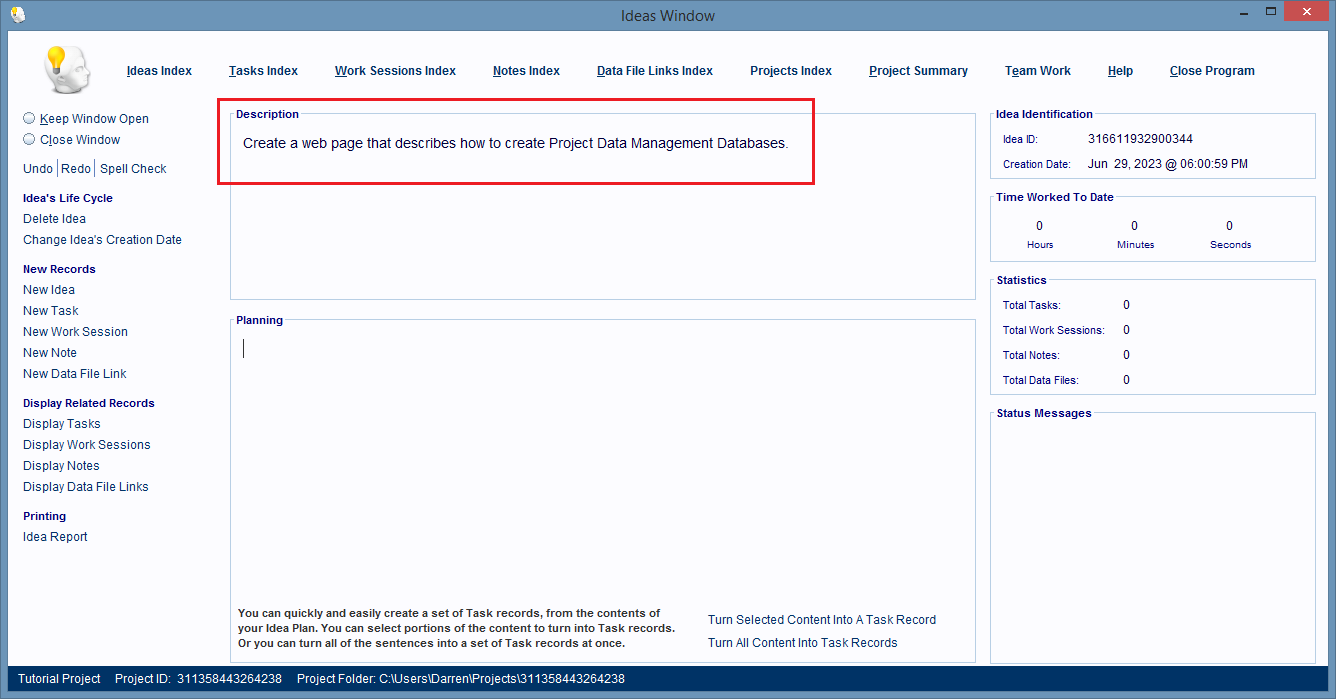
2. After this hyperlink is clicked a new Idea record is displayed in a new window. All you need to do now is give the new record a proper description.

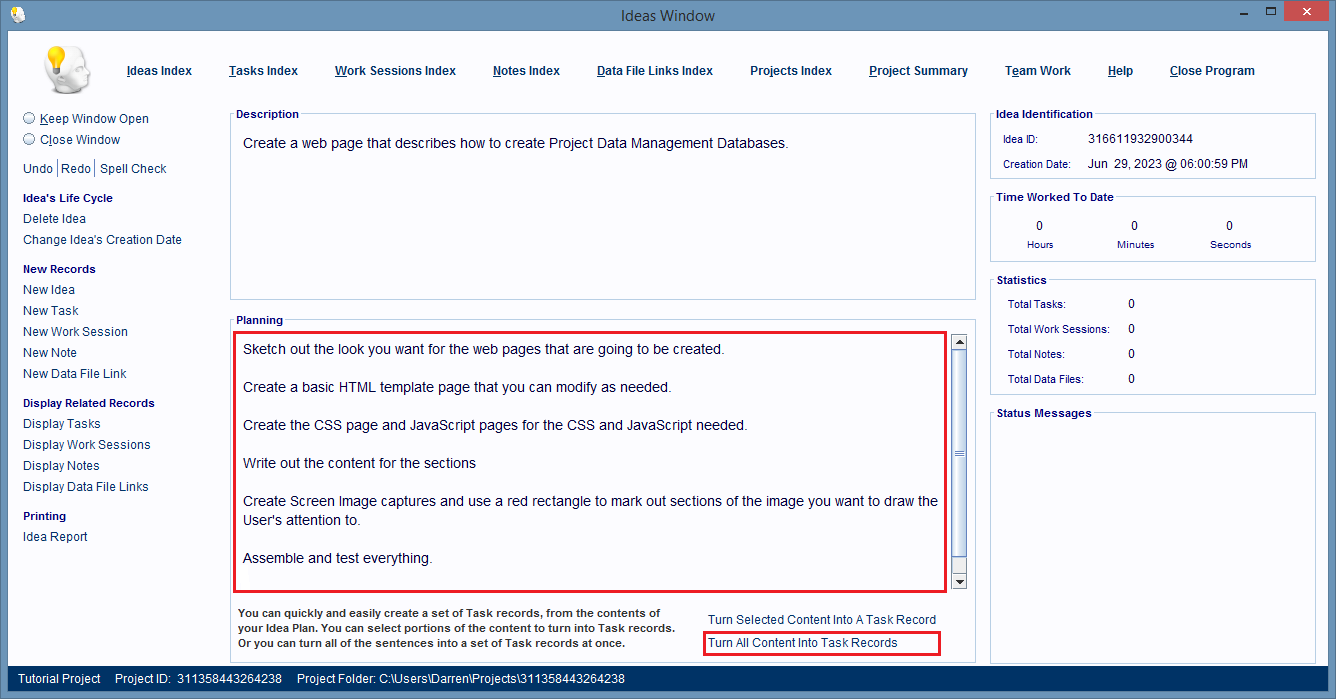
Creating A Set Of Task Records At Once
3. Now we'll create 6 task records for this idea by typing each task's description in the Planning field and then clicking on the Turn All Content Into Task Records hyperlink.
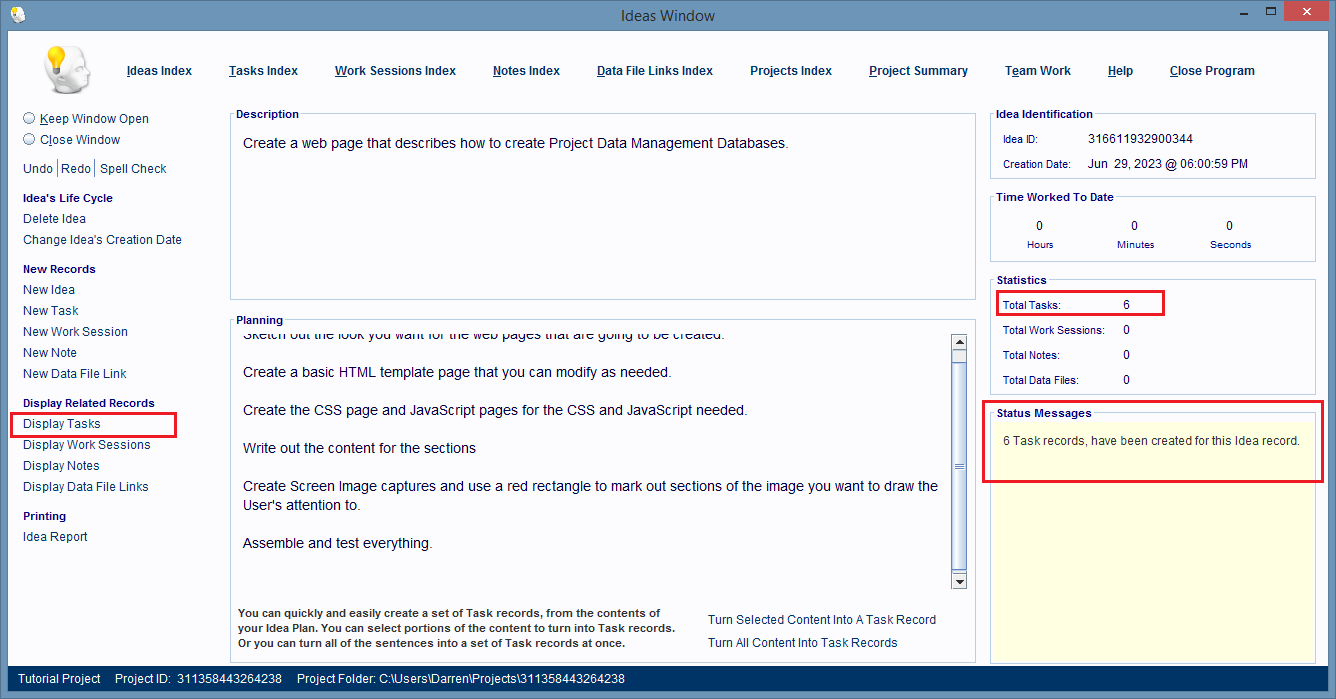
4. After the Turn All Content Into Task Records hyperlink was clicked the new task records were created, linked to the Idea record, but not displayed. The Ideas Window shows the 6 new records in the Status Messages panel and the Statistics panel.
Now we've done what we initially set out to do, which was to create an Idea record and an initial set of Task records for it.
To display these Task records all we need to do is click the Display Tasks hyperlink in the Ideas Window.
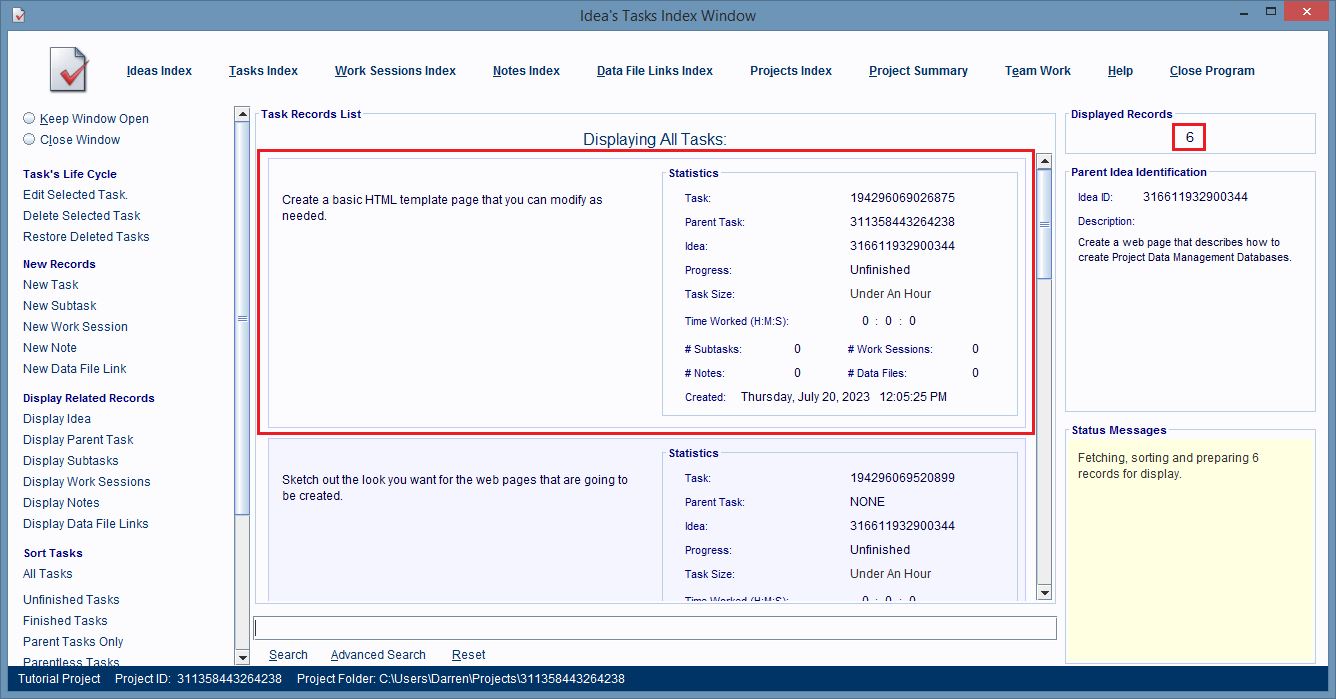
Displaying The Set Of Tasks The Idea Record Is Linked To
After the Display Tasks hyperlink is clicked an 'Index' type window, the Idea's Tasks Index Window is displayed. This window shows all the Task records linked to the parent Idea record.
Each task record is represented by an entry card in the center of the window.
Summary
What's important to understand from this section is that record groups get created when you create an Idea record.
To create that Idea record all we had to do was click on a New Idea hyperlink, a record was created and displayed and then we gave it a description.
That's all you ever have to do to create any type of record, just click on the appropriate New... hyperlink and when you see your new record give it a description.
But, when you're working with Idea records, you can use the Ideas Window's Planning field to create the descriptions of one or more tasks, and then turn those descriptions into Task records by clicking a single hyperlink, the Turn All Contents Into Task Records hyperlink.
Logically, We Should Be Looking At Creating Work Session Records Next, But Instead We'll Look At Record Navigation
Typically after you create a Task record, you'll likely want to create one or more Work Session records for it and this would be a good place to show you how to do that.
However, what we're going to do is take a brief look at record navigation instead because when you're working with records it's really nice to know how to get from that record to one of its parent records or a list of its child records. When we clicked the Display Tasks hyperlink in the Ideas Window, you saw an example of how to go from a parent record to a list of child records.
Navigating From A Record To A Parent Or Child Record
When Idea, Task, Subtask, Work Session, Note, and Data File Link records get created they're automatically linked to one specific parent record, all of that record's parent records, and the Idea record at the top of the record group they're going into.

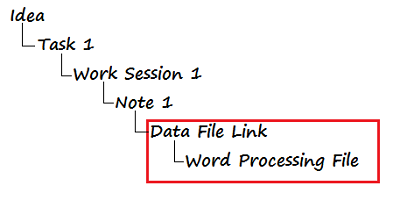
In the figure above, the Data File Link record is directly linked to a Note record, and indirectly linked to all of that Note records parent records, which are the Work Session, Task, and Idea records above the Note record.
When you're in a window that's working with a record, you can navigate from that record to one of its parent records, or to a list of its child records, by clicking on the appropriate Display... hyperlink found on the left hand side of the window.
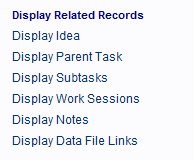
How Do You Know If Clicking A Display... Link Is Taking You To A Parent Record Or A List Of Child Records?
As you can see all of these hyperlinks start with the word 'Display' and end with the name of the type of record they'll display.
If that name ends in an 's', then clicking that hyperlink displays a list of child records, otherwise, you're going to see the parent record displayed in its editing window.
That's all there is to navigating from one record in a record group to another, just click the appropriate Display... hyperlink.
Creating Work Session Records & Scheduling Them
Work Session records represent a specific period of time when work was done, or will be done on a specific task or subtask.
Creating The Work Session Record
1. To create a Work Session record just click the New Work Session hyperlink in any window that displays it.
Most of the time you'll create one of these records while you're in a window that's working with its parent task record.

After the New Work Session hyperlink is clicked a Work Session record is created, linked to the parent task, all of its parents, and the Idea record at the top of the record group. Then, it's displayed to you in a new window.
2. When you see it you'll notice that it has the same description as its parent task, you can change that if you want to, but often it's just the one you want.
Scheduling The Work Session Record
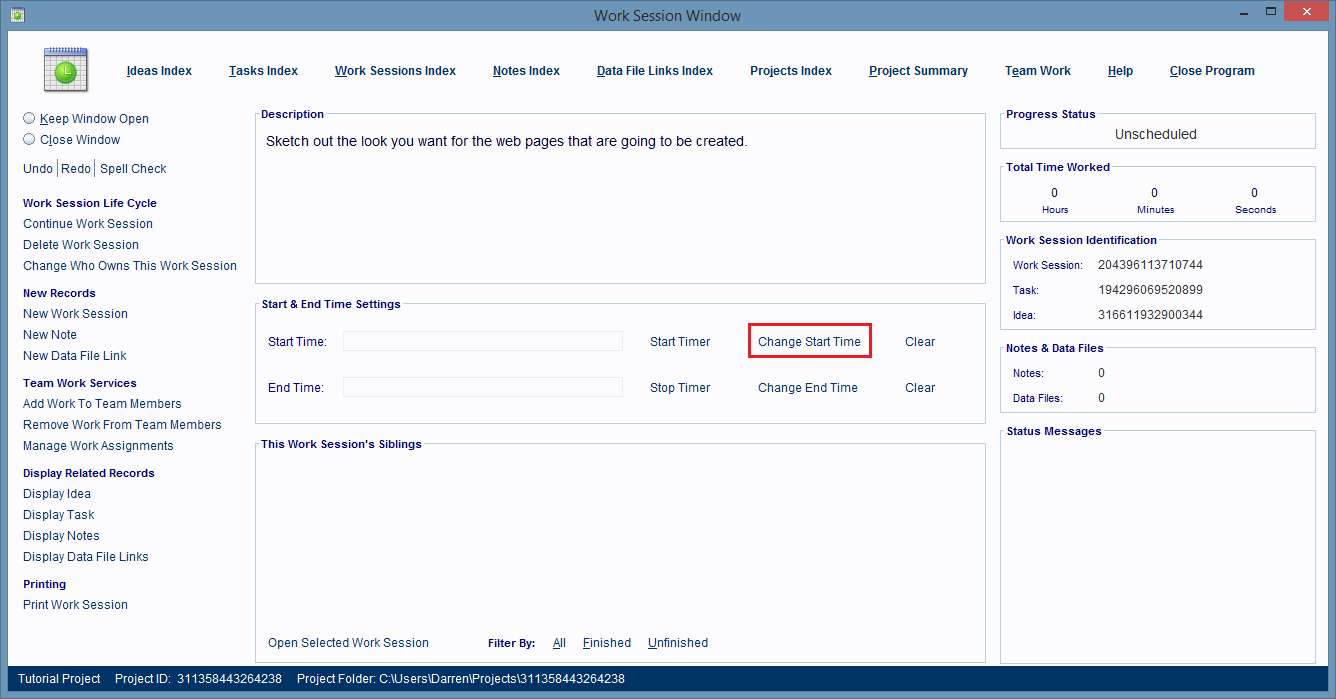
1. To schedule a start time and date for this Work Session just click on the Change Start Time hyperlink.

2. A very simple, unfancy, time and date dialog box pops up and you just enter the time and date settings you want into it.
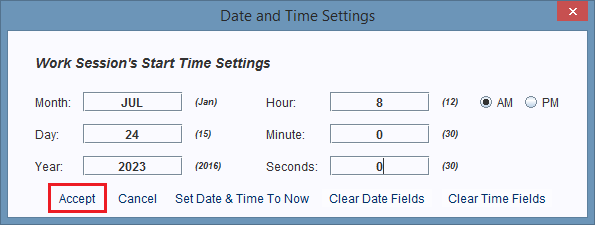
3. When you're done click the Accept button, the dialog closes and the record has a new start date scheduled.

Assigning People To Work Sessions
Team and Team Member records are used to represent people working on a project and the teams they belong to. In this section I'm going to be showing you how to create these records, and then link them to a Work Session record.
Work Session records use a single Work Assignment record to keep track of the teams and people assigned to that work session.
Creating The Work Assignment Record
Before you can create a Work Assignment record you need to be in a window that's working with its parent Work Session record first.
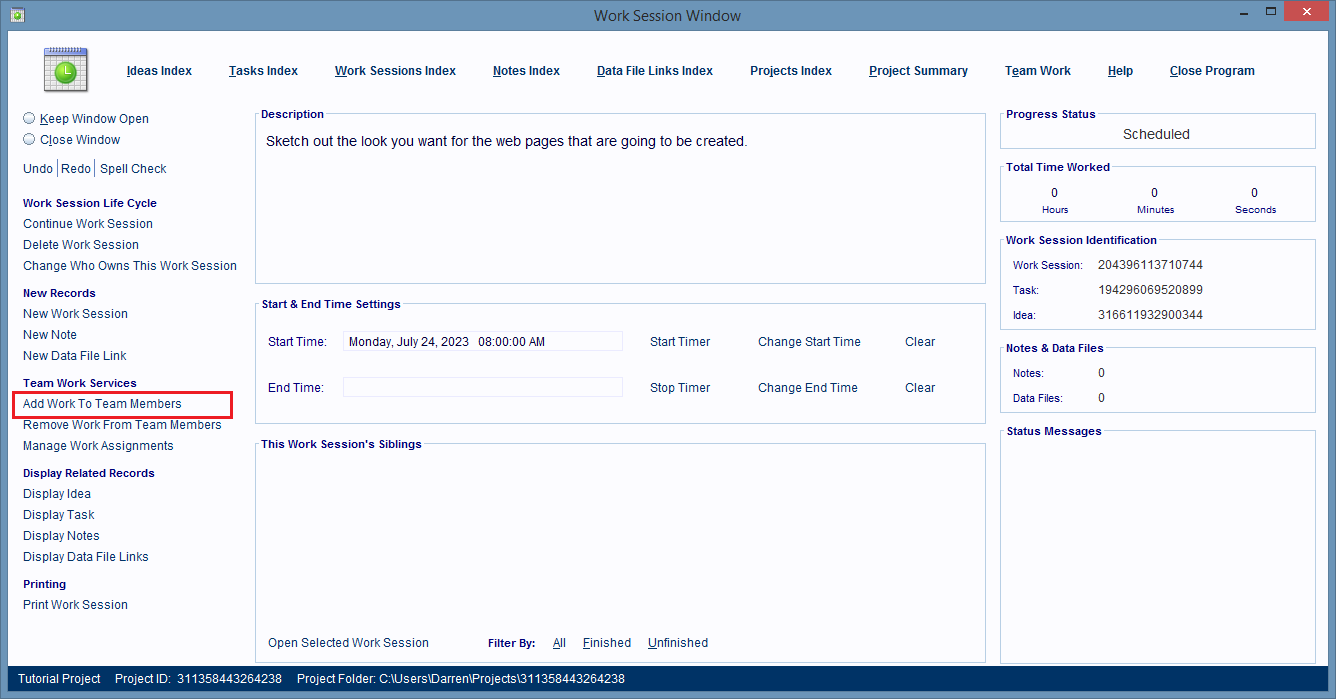
1. To create a Work Assignment record you need to click on the Add Work To Team Members hyperlink, found only in windows that work directly with Work Session records.
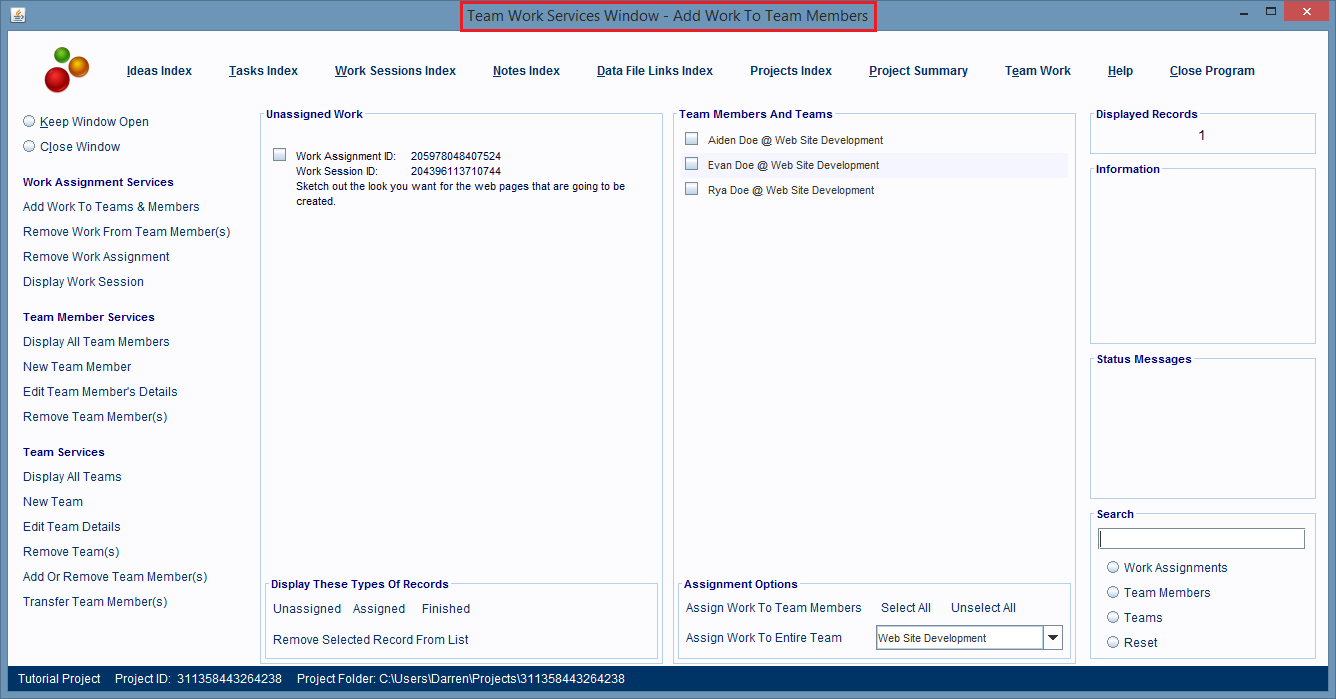
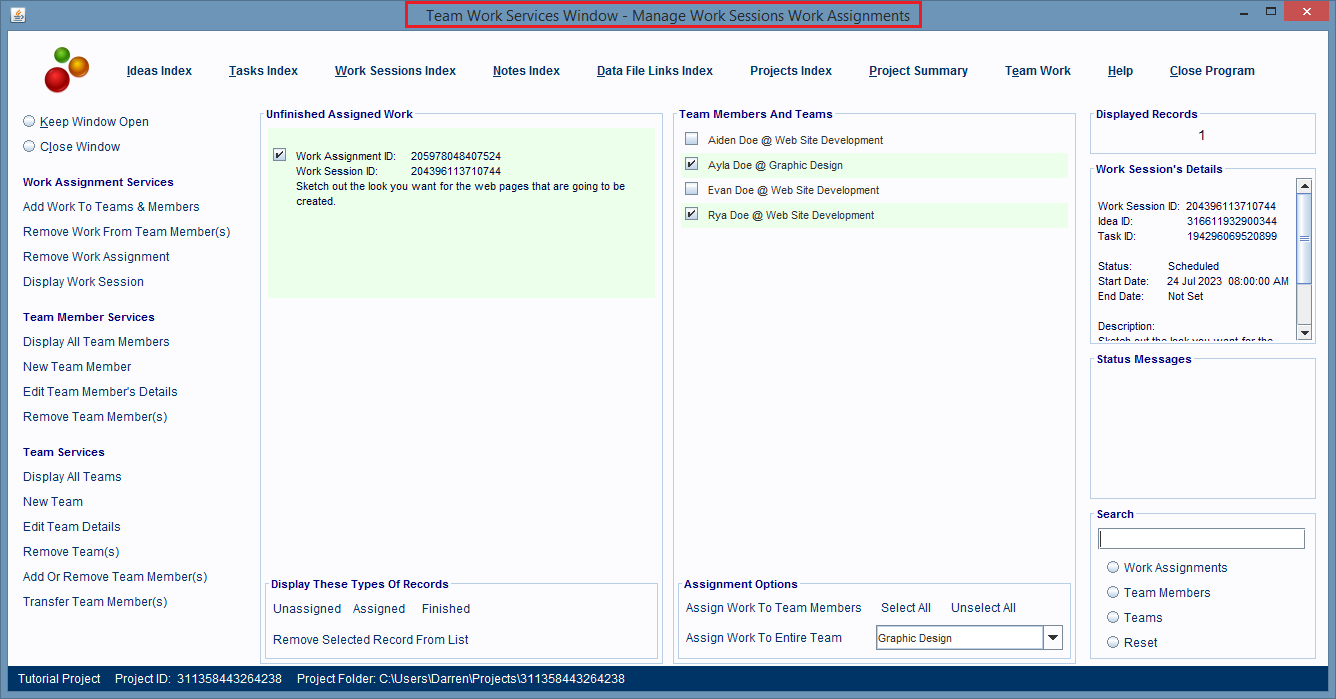
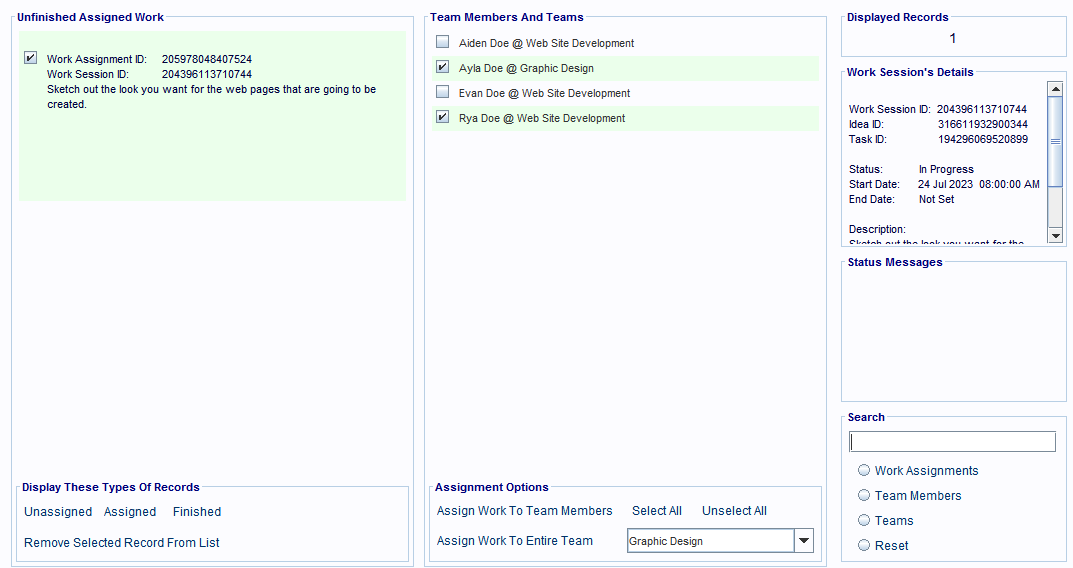
2. After you click this hyperlink the Team Work Services Window opens. This window is used to manage Work Assignments, Teams, and Team Member records, and it doesn't look or behave like any of the other windows you've seen so far.
A Bit About How The Team Work Services Window Displays & Collects Information
This window uses panels in the center of the window to collect and display information related to some kind of task you're performing.
When you change the task you're running, then one or both of the center panels will change also.
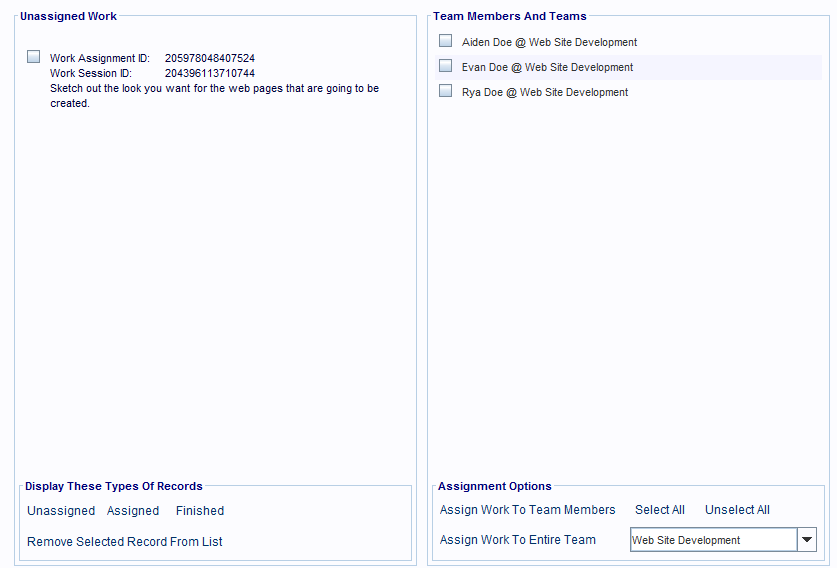
3. The Work Assignment record that was created for our Work Session is shown in the Unassigned Work panel and to its right is a list of people (and the teams they belong to) that we can choose from, and assign to the work assignment.

4. To assign a person to this work assignment record we'd do the following:
- Click on Work Assignment record to select it.
- Then we'd click on the check box, next to the name of each person we wanted to assign to that work assignment.
- After that's done, then we'd click on the Assign Work To Team Members hyperlink (at the bottom of the Team Members Panel), and all of these records would be linked together.
But, in this demonstration, we're going to do something different. We're going to create a new team (the Graphic Design team) and then add a new employee, Ayla Doe, to that team. Then after that's done, we'll link her to the work assignment record we created earlier.

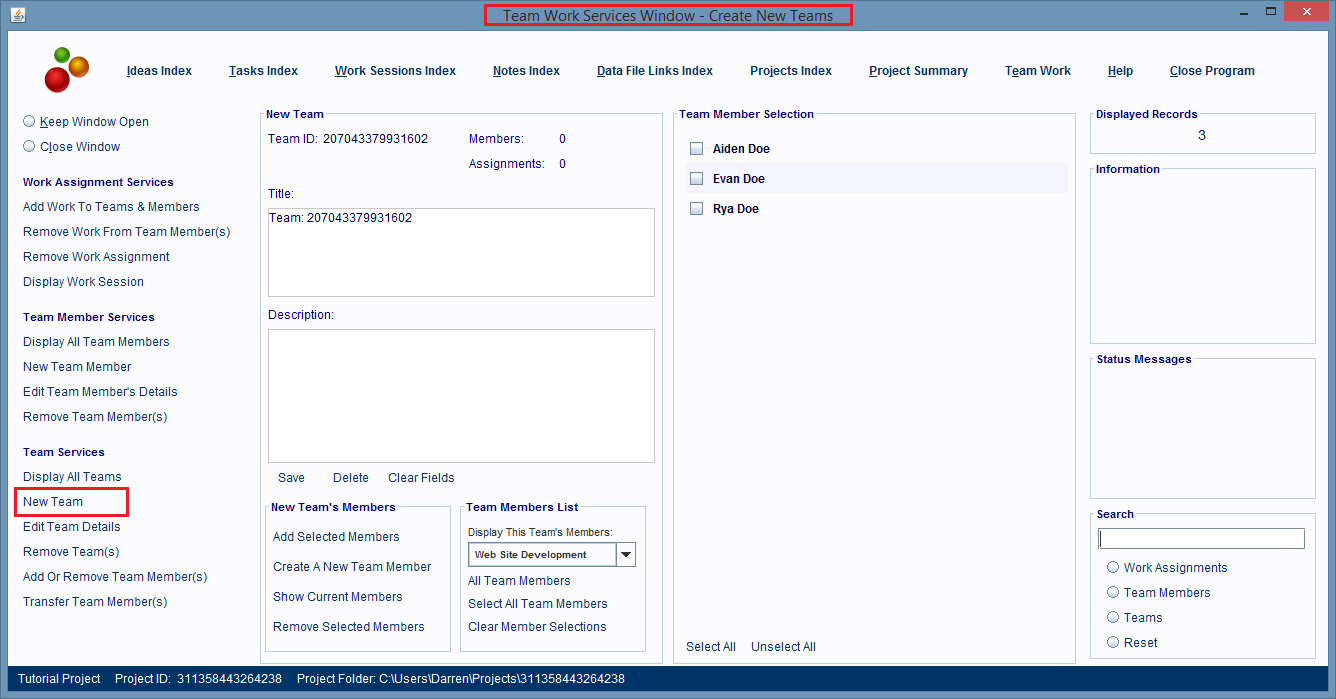
Creating A Team Record
1. To create a new team, click on the New Team hyperlink on the left hand side of the Team Work Services Window.
After that link is clicked the center panels change to the ones used for creating Team records.
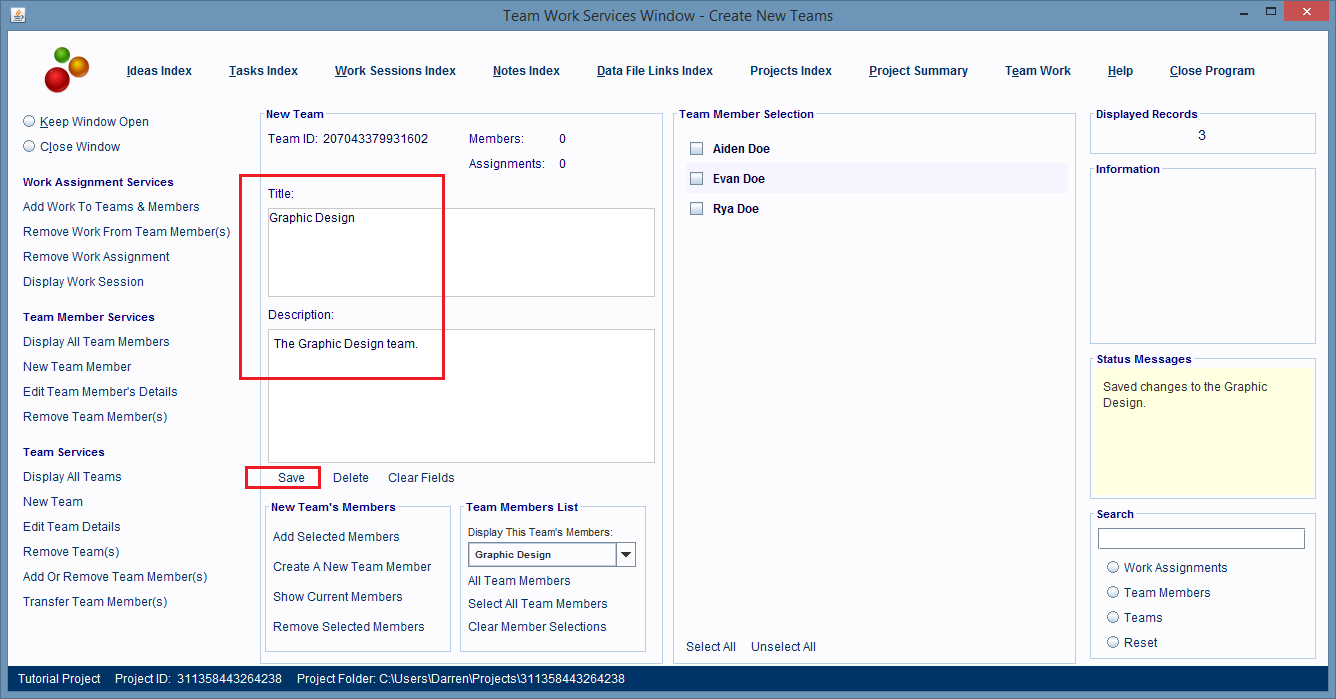
2. In the New Team panel give the team a title and a description.
Then you must click the Save hyperlink to save the changes. These types of records don't auto save like other records do.
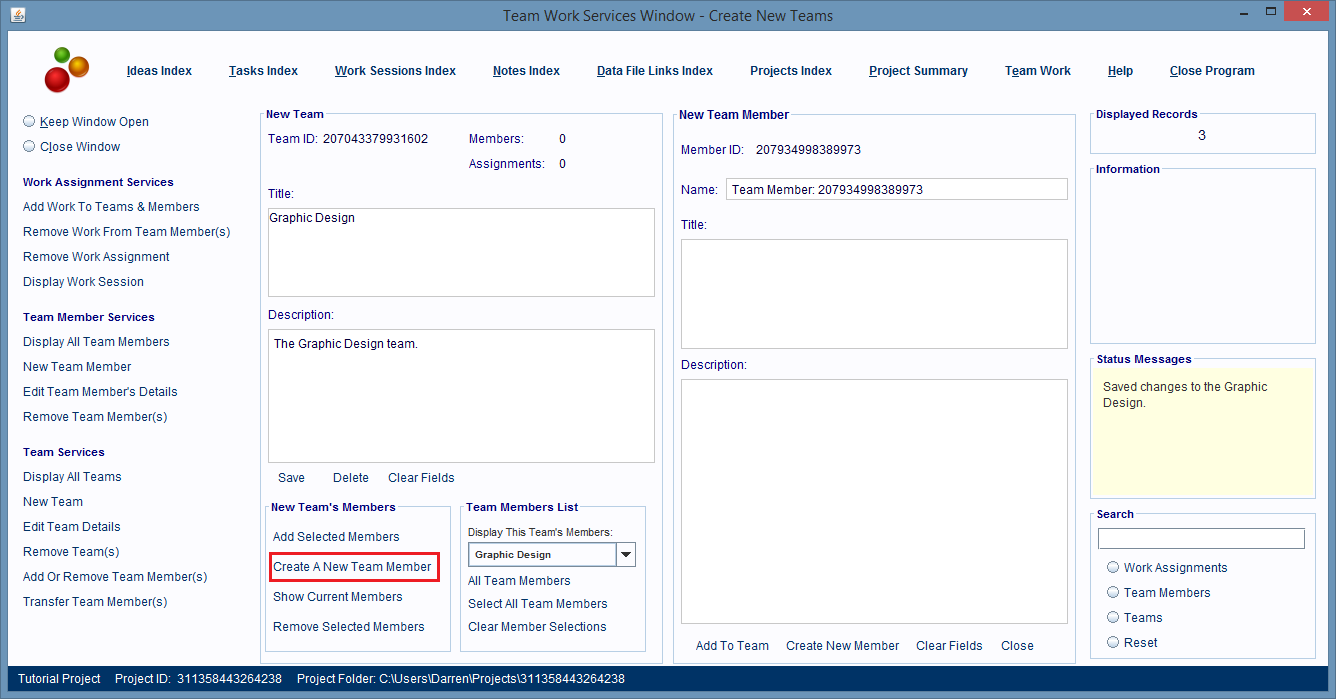
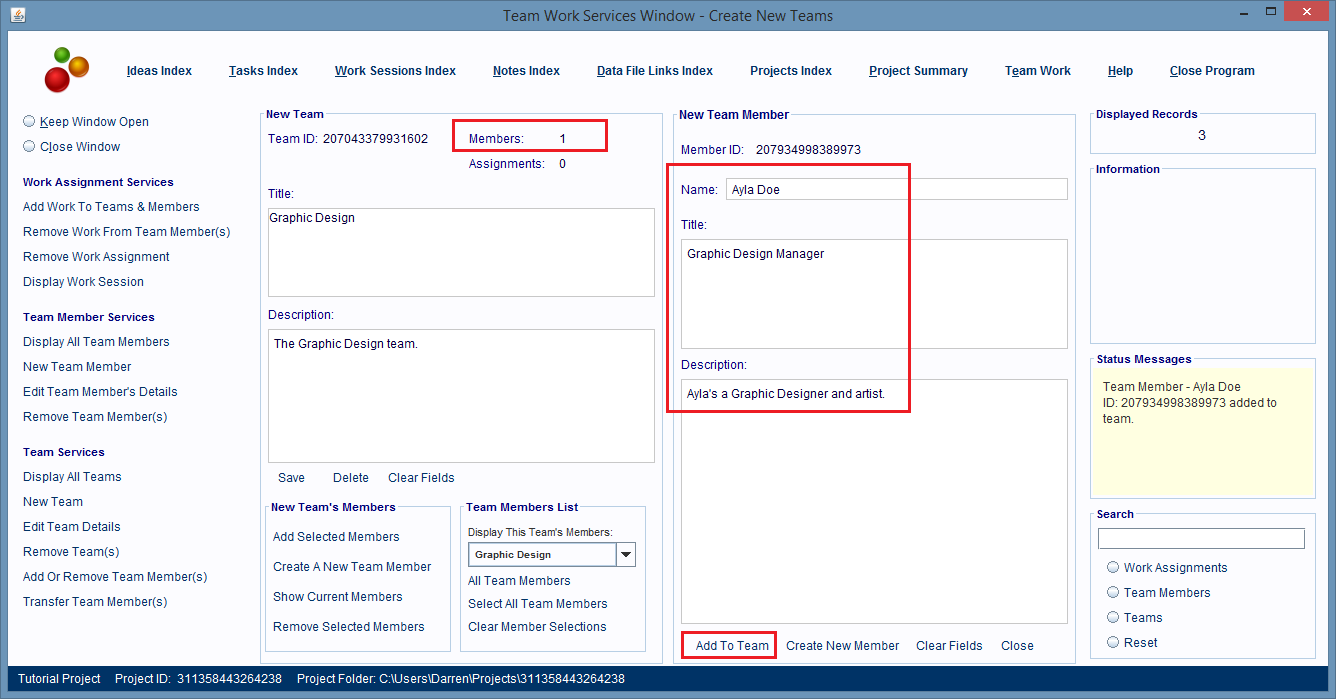
Creating A New Team Member And Adding Them To The Team
Now we're ready to create a new Team Member record and have it added to the team.
3. To do this click on the Create A New Team Member hyperlink in the New Team panel.
Now the right side panel changes to the New Team Member Panel.
4. Give the new team member a name, title, and description.
Then click on the Add To Team hyperlink at the bottom of the New Team Member panel.
Assigning Team Members To The Work Assignment
At this point we've created our new team and team member records and have linked them together. Now we're ready to assign our new member Ayla, to the work assignment.
1. To do this, just click on the Add Work To Teams & Members hyperlink on the left hand side of the window.
After this link is clicked, the center panels change again.
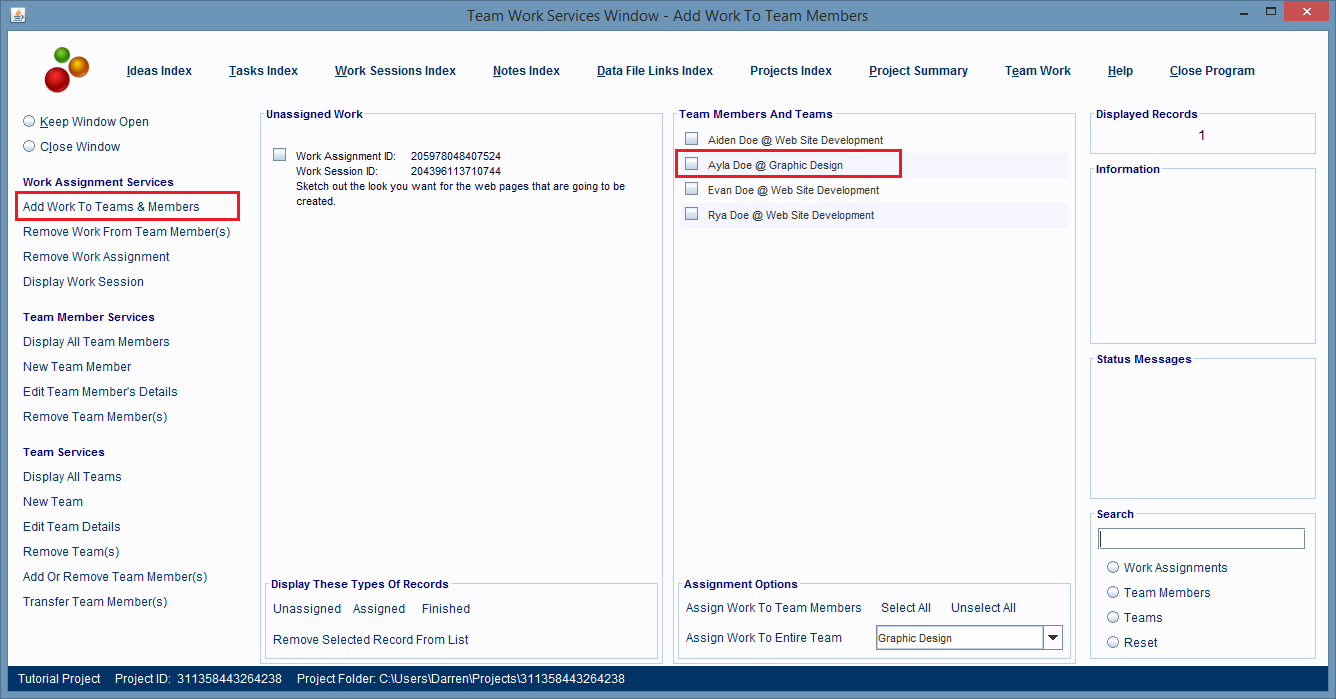
2. Now, we click on the Work Assignment record to select it and we click on each Team Member @ Team record to select who will be linked to the Work Assignment.
3. After that's done, we just click on the Assign Work To Team Members hyperlink a the bottom of the Team Members panel.
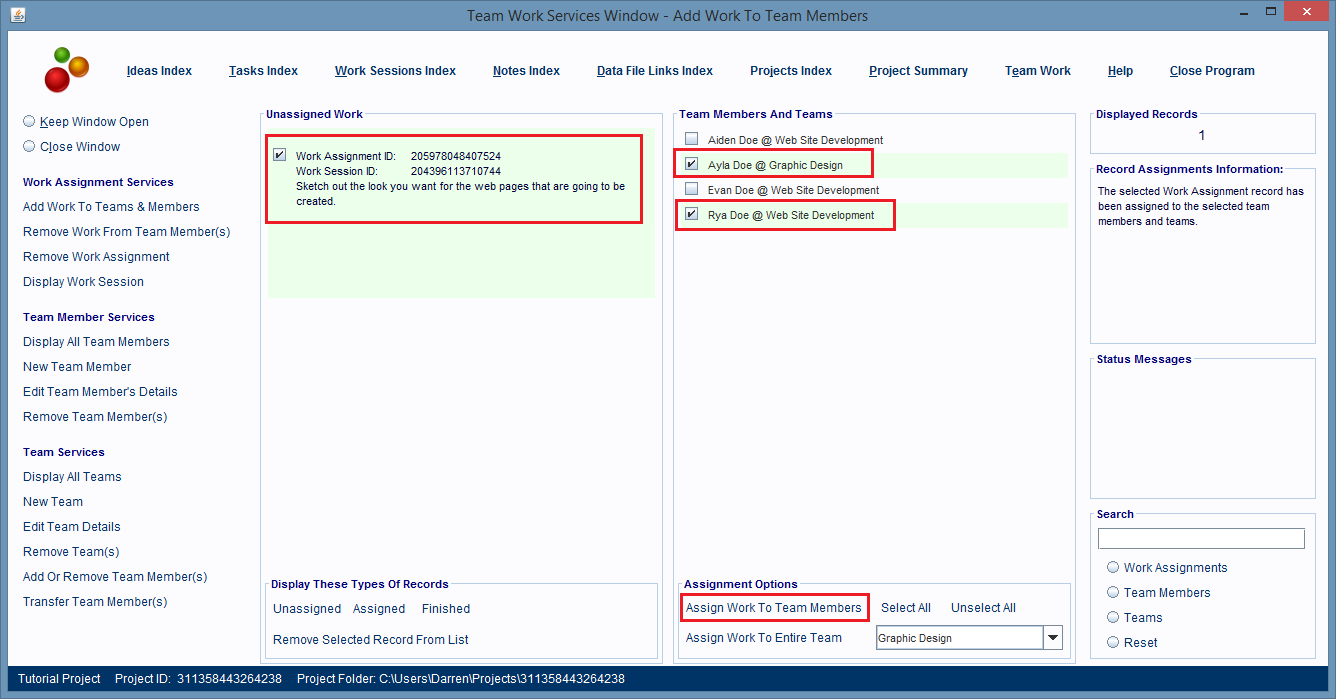
Returning To The Work Session Record
Now we're all done. We've created a new Team and Team Member and we've linked that member and another to the work assignment.
Now we can go back to the Work Session record and to do that all we have to do is click the Display Work Session hyperlink on the left side of the window.
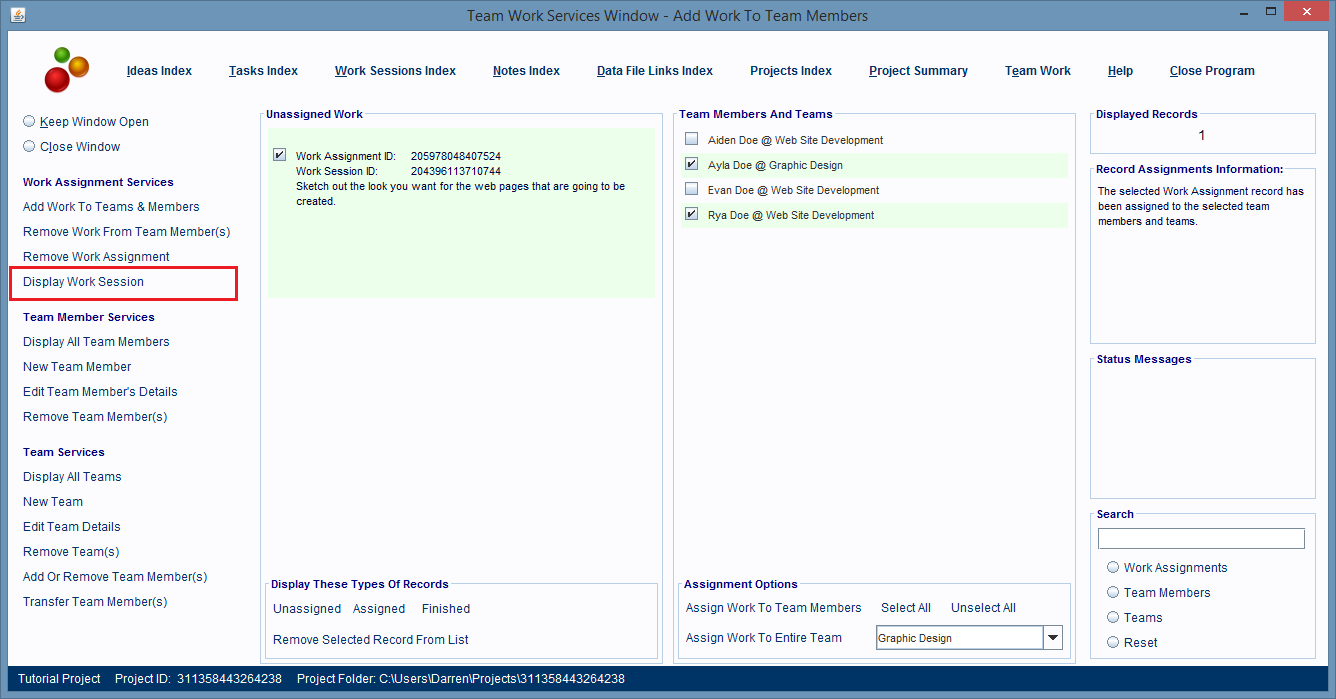
After we click that hyperlink the Work Session Window is displayed.
The Work Session record won't know anything about who's been assigned to it because it leaves that job up to the Work Assignment record.
How To Ask A Work Session Record To Show Us Who's Assigned To It
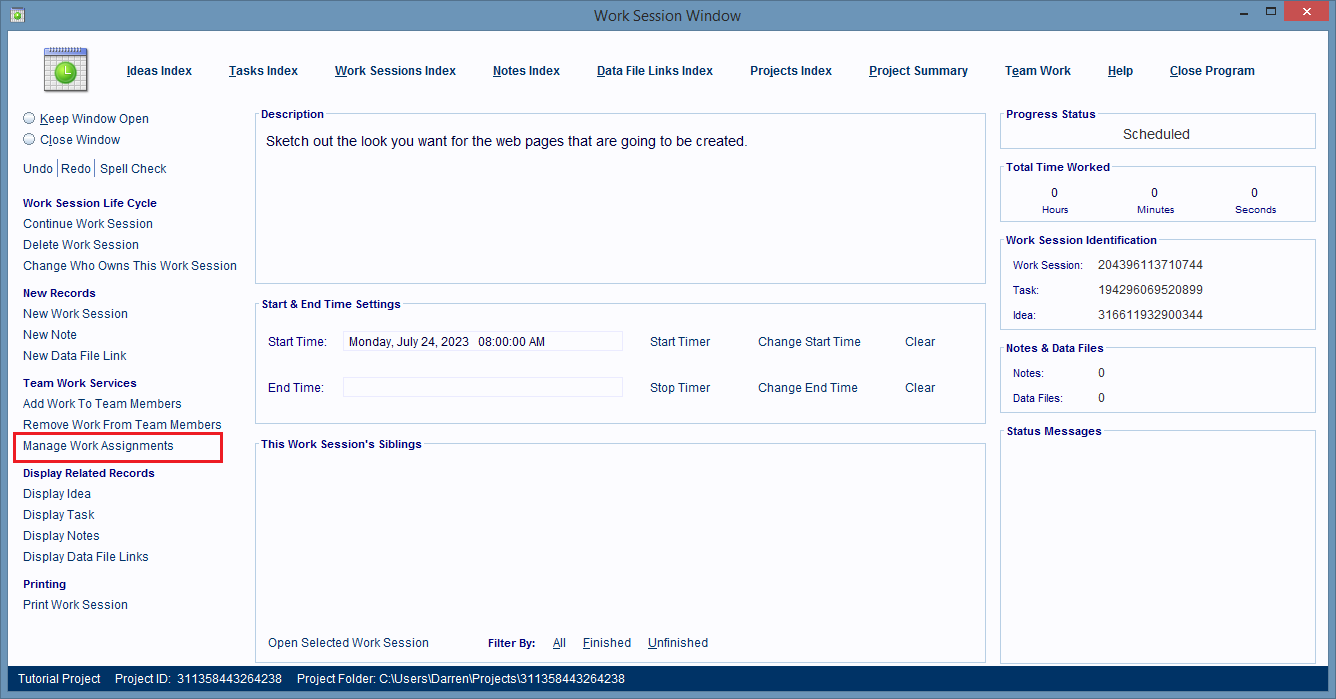
However, in the future if we want to look at who is assigned to this work session all we have to do is click on the Manage Work Assignments hyperlink in the Work Session window, and the Team Work Services Window will be displayed and it'll show our Work Assignment record and who's linked to it.
About Linking Computer Files To Database Records
In my opinion this is the most important feature this software offers. That's because the bulk of a project's data is stored in non-digital and digital data sources and this software makes it incredibly fast and easy to track and retrieve any kind of data. And, when I say any kind I literally mean, any kind!
How Can Software Like This Organize And Track Non-Digital Data?
Non-digital data is data such as thoughts in your head, paper based information, whiteboard contents, discussions, and so on. Basically it's any data that's not stored in a computer file (digital file). Projects have a lot of this kind of data and it's not easy to manage, locate, and retrieve, and especially not at the speed that a database can work with its data.
Obviously databases can't work with non-digital data directly. You can't just pull a thought out of your head and stick it into a database record as is. Nor can you have a database record displaying on your monitor, cover it with a post it note, and think that the database can track the note now.
But there is an extremely simple way to convert any kind of non-digital data to digital data stored in a computer file and that's to use the factory 'apps' found on any modern smart phone.
A Smart Phones Factory Apps Can Capture And Convert Any Kind Of Non-Digital Data To Digital Data Stored In A Computer File
I can't think of any non-digital data sources, related to any kind of project, that can't be photographed, drawn, painted, written down, or video and/or audio recorded.
After your smart phone converts the non-digital data and stores it in a digital file on the phone, this software can easily copy that file and create a link between it, and the set of databases that its contents are related to.
Once those records are tracking that file they can locate and load it for you in under 30 seconds, without you ever having to know anything about the file's name and/or file path.
Linking Computer Files To Database Records Is Easy
Computer files of any type and amount can be linked to any Idea, Task, Subtask, Work Session, or Note records. When a file is linked to a specific record the software automatically links it to all of that record's parent records as well. This allows all of these records to track that file and makes it very fast and easy to locate and load it again in the future.
This image shows a Word Processing file that's linked to a note record directly, but it's also linked to all of that note's parent record too and all of them are aware of it and can easily locate and load it in the future.
Before you can link a computer file to a database record you first need to be in a window that's working with the record. In this demonstration I'll be linking computer files to a Work Session record. Idea, Work Session, and Note records tend to be the most common types that file's are linked to directly.
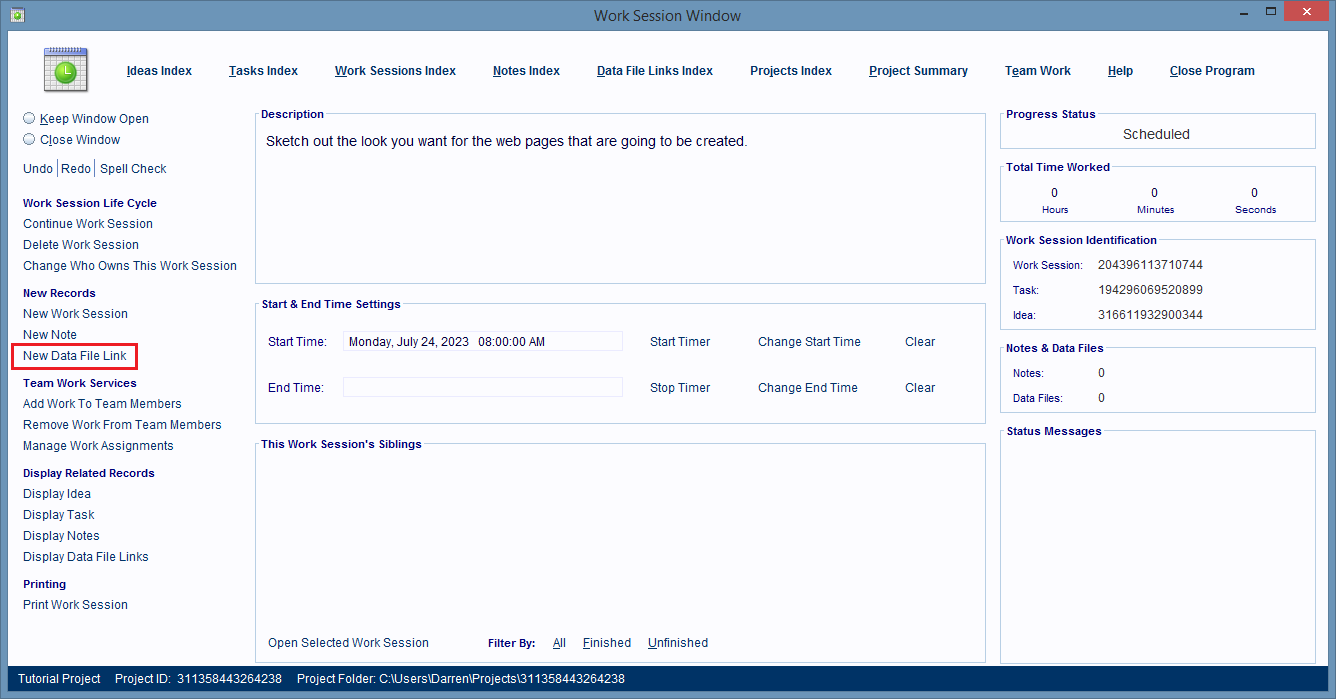
To start the linking process just click on the New Data File Link hyperlink on the left side of the window displaying your record.
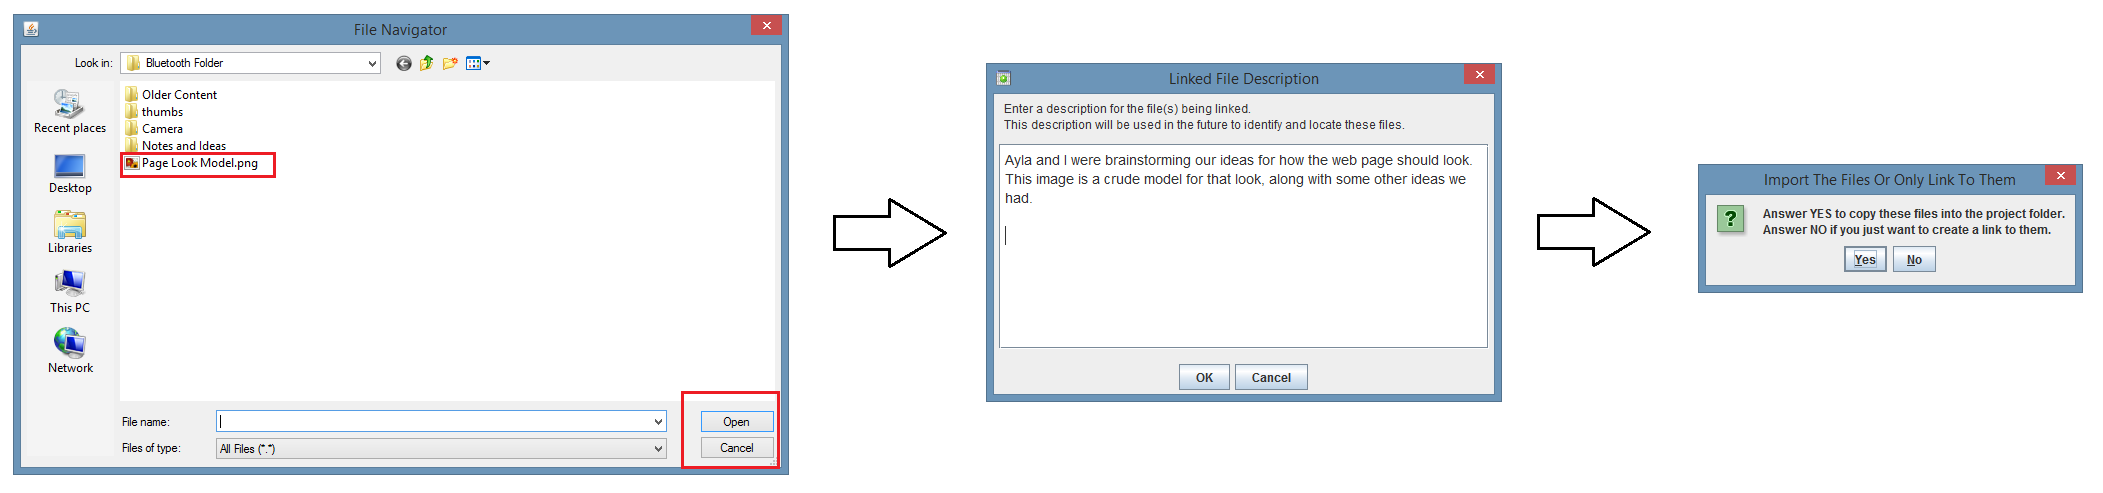
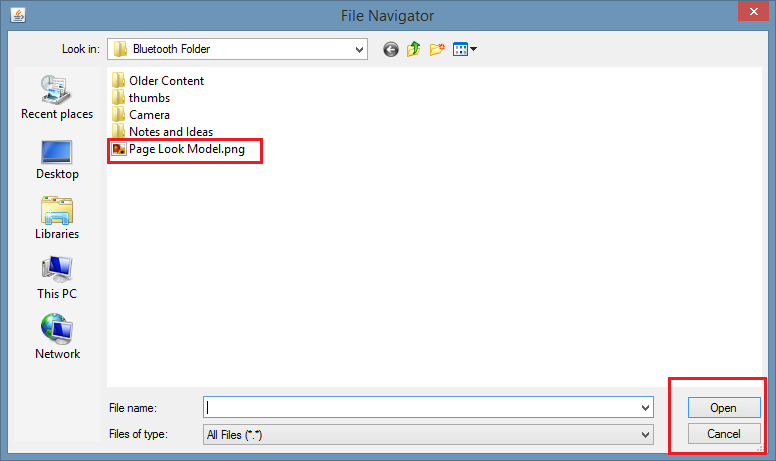
After you click that hyperlink a File Navigation dialog box is displayed. Use it to navigate to and select the files you want linked to the database record.
Then click on the Open button and the dialog box closes.
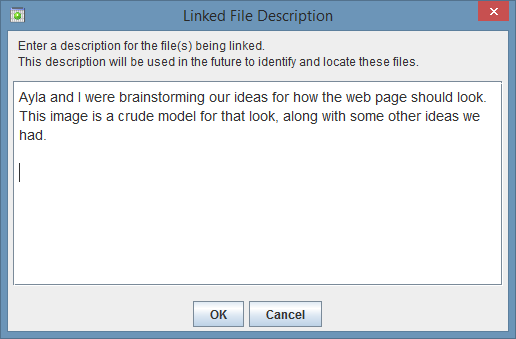
A new dialog box opens and this one is asking you to provide a description of whatever is important to know about the files being linked.
Every file being linked will get its own Data File Link database record to represent it, and the description you write here, will be the contents of those records description fields.
You can write as much content as you want in this dialog box. When you're done click the OK button and it'll close.
A new dialog box opens and this one asks if you want to link to the original files, or to copies of them, placed inside the Project Folder. 99% of the time it's best to answer 'Yes' to this question and link to copies of the files. Mainly because the software provides a Project Backup system that backs up everything in the Project folder, so if your files are in there, they're backed up, and always available.
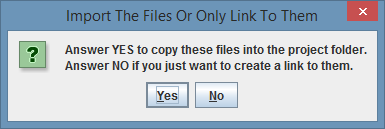
After you click Yes, or No, this dialog box closes and the linking process is done.
The window you're working in will tell you how many files were linked and it'll increase its current total.
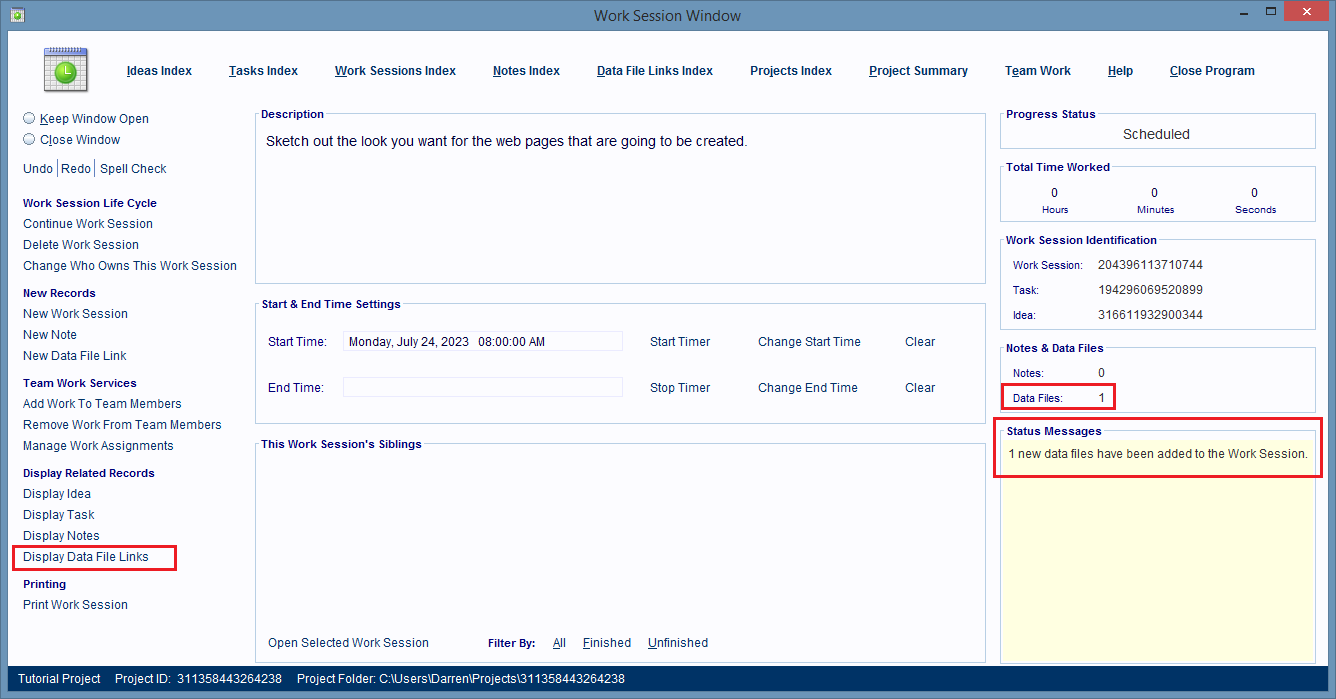
If you want to see the files owned by the Work Session then just click the Display Data File Links hyperlink (image above) and a new, 'index type' window will open and show them.
You can use an 'index type' window's Search panel (it's beneath the records list) to do normal and advanced keyword searches for records displayed in that window.
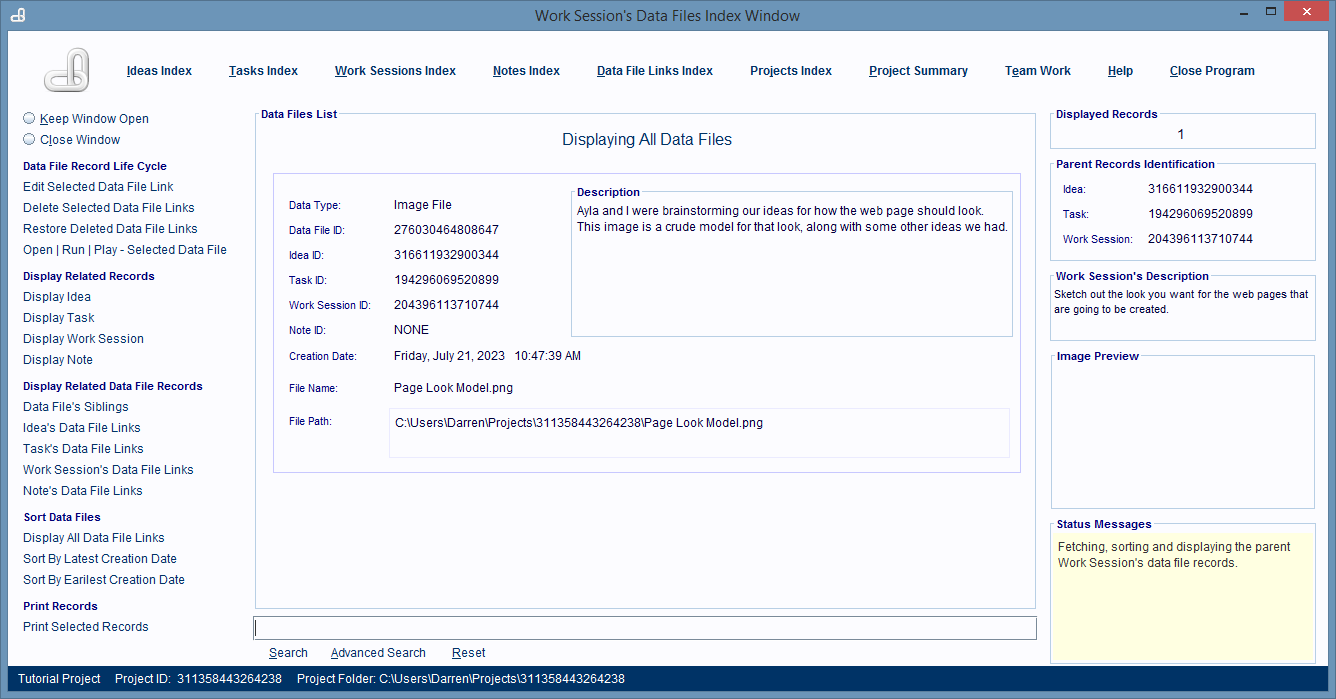
Data File Link Records Store A Lot Of Valuable Information About Their Computer Files
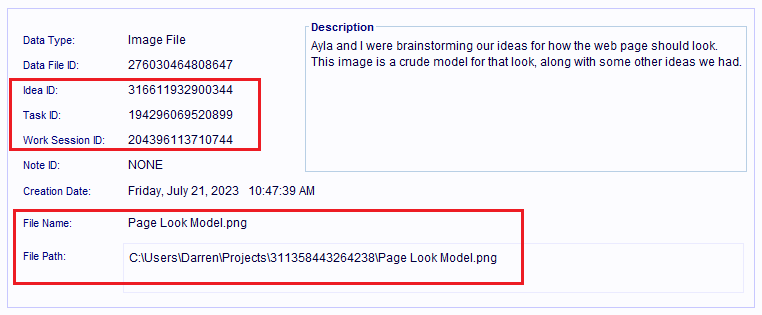
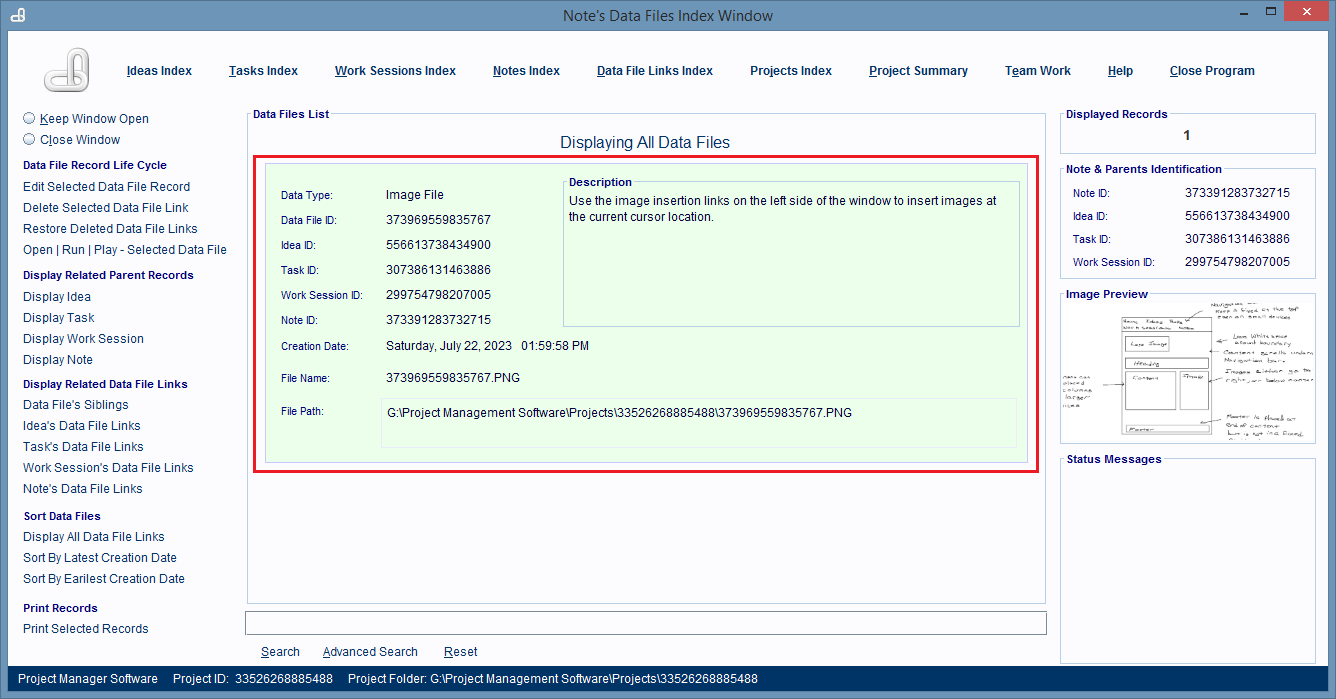
If you look at the Data File Link record for the file that was just linked you'll see that its recorded the file's name and complete file path, along with the ID numbers of the most important 'parent' records it's linked to. You'll also see the description that was provided during the linking process.
In the future when you want to locate and load this file again, any fragment, even a single character from any field in the record will be all it takes to locate this file, using a simple keyword search.
How To Find And Load Records, Notes, And Computer Files
The simplest way to find anything in the databases is to use a keyword search, in the Search panel of any type of 'index window'.
Such as the Note's Data File Links Index Window, which shows all the computer files linked to a specific Note record.
After you click the Search hyperlink (while using a normal keyword search) The 'index' window displays a list of matching records.
You visually scan the list for the record(s) you're looking for. If the list is long run another keyword search to shorten it.
The entries in these lists are linked to either a database record, note record, or a computer file.
To load and display whatever the record entry is linked to, just double click anywhere on that entry, and that record/note/computer file will be displayed in a new window.
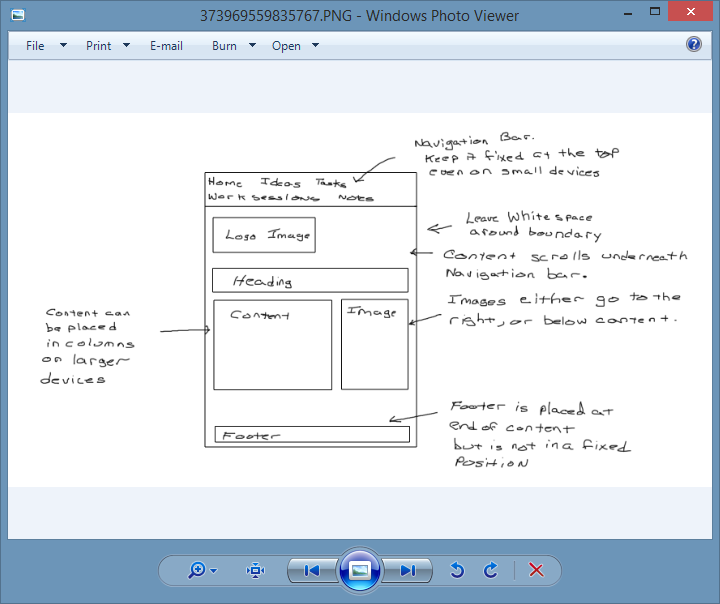
If the entry is linked to a computer file, then when you double click that entry, the software that works with that kind of file is going to be told to load and display that file.
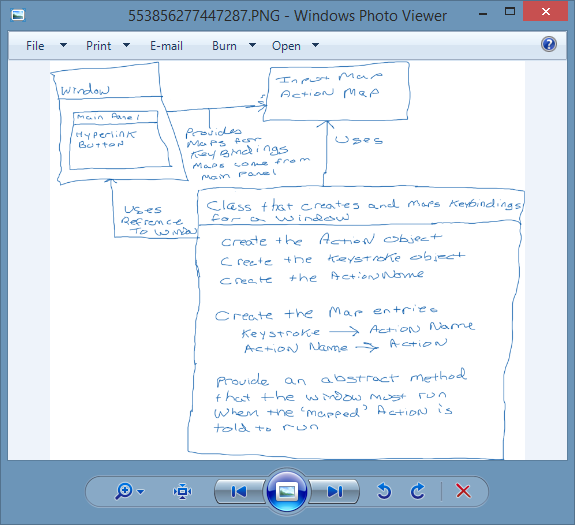
In this image, the image file belonging to the record entry above, is loaded and displayed using Windows Photo Viewer.

An In Depth Look At Searching For Linked Computer Files
In the previous section, I showed you the fundamental way to search for any database record, note record, or computer file and display it, but the explanation left out some important background details. Such as what index windows are used for, how they basically work, and how to display them.
So what I want to do now, is show those extra details as part of a larger demonstration, that shows how to search for computer files - which is one of the most important skills to know and use with data management software such as this.
In this demonstration I'm going to be using the Search Panel found in the Data File Links Index Window to locate and display an image file that was linked to a set of database records a long time ago.
Unfortunately this demonstration is long because it also needs to briefly describe sets of things that are related to searching for records, files, or notes, but it's worth reading and understanding.
In the demonstration we'll be following a logical order for doing things, but every now and then, we'll have to deviate from that 'natural' path to look at one of these 'background' topics, and then come back to the path in a later section.
About Index Windows
Index windows display lists of specific types of database records, such as Data File Link records.
Each type of database record has its own type of 'index' window, that's used to display lists of 'record entries'.
Each 'record entry' represents one specific database record' and when you see one of these entires, just pretend it's an actual record, even though it's not.
'Index' windows get opened by either clicking on a Display... hyperlink in some other window, or one of the 'index window' hyperlinks displayed at the top of some window. The examples below show the difference.
If you're in a window that's working with some type of record and you click one of the Display... hyperlinks in that window, such as Display Data File Links hyperlink, then a new 'index type' window (not shown) will be displayed. This 'index' window will only be displaying the records linked to the parent record you were working with in the other window.
But, if you open a Master Index Window, by clicking one of the 'Master Index Window' hyperlinks displayed at the top of every window, then that index window will be displaying all of the records of that type in the database.
Regardless of who's records the 'index' window is displaying, all these windows basically work the same way, and we'll see more about them in the demonstration.
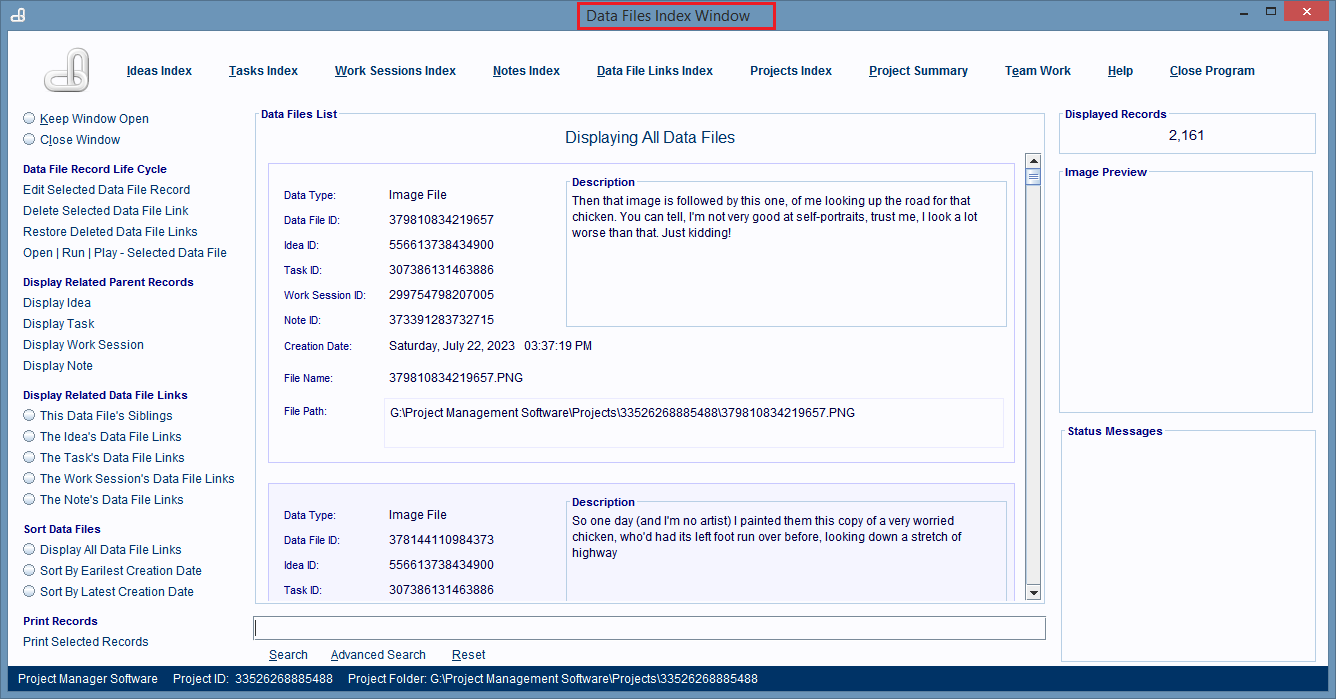
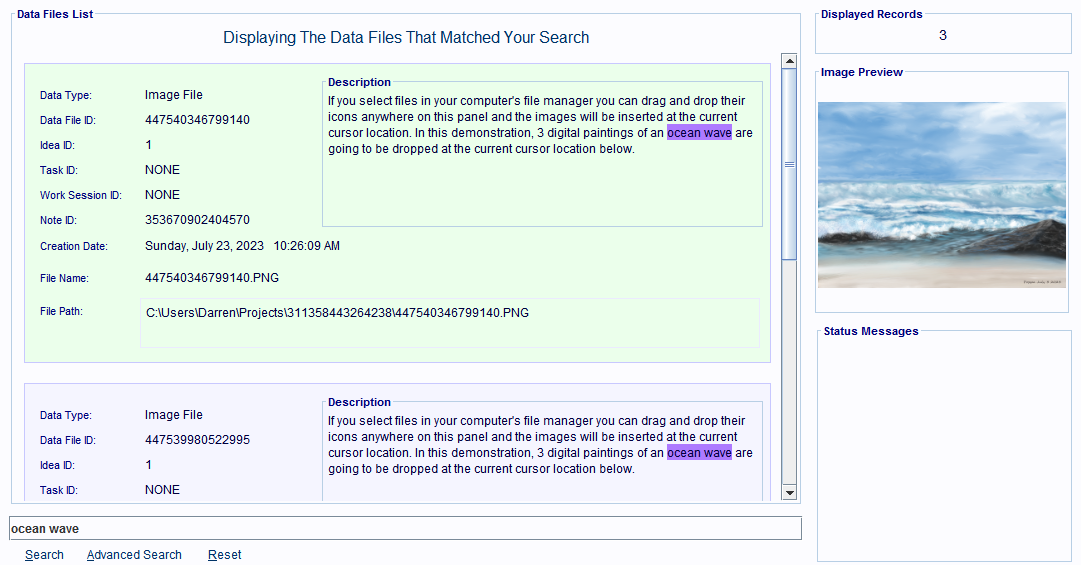
Using The Data Files Index Window To Locate And Load A Computer File
To open the Data File Links Index Window click on the Data File Links Index hyperlink at the top of the window you're in.

The Data File Links Index Window opens and its displaying all of the linked computer files in the project.
The window in the image is linked to 2,157 computer files.
At the bottom of every 'index' type window is a Search panel, for doing normal and advanced keyword searches, that can help you find a specific record(s) in the list.
But, before we disucss how it's used, let's first look at how vague and/or small, the keywords you'll use can be.
Vague Keywords Are All You Need To Find Anything
When you're searching for computer files, most of the time all you can remember is something vague about their contents, and next to nothing about their file name and/or file path. That's why this search system was designed to take extremely vague keywords and use them to rapidly find what you're looking for.
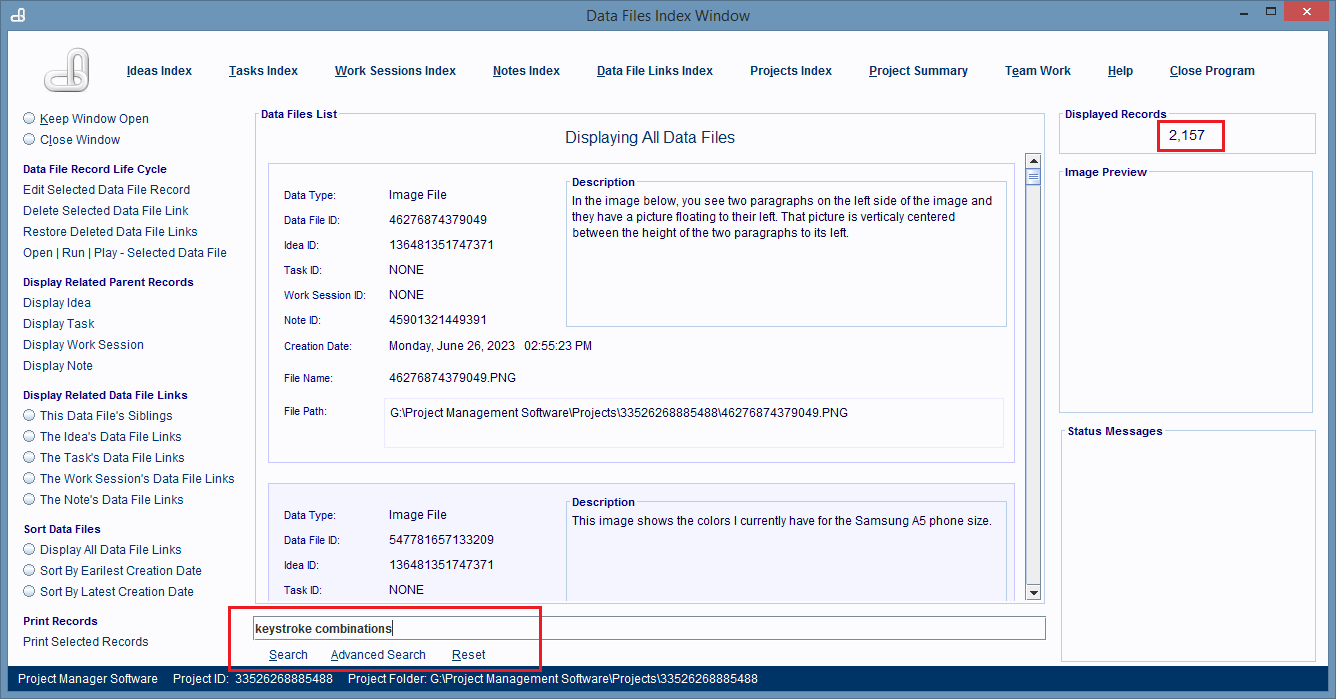
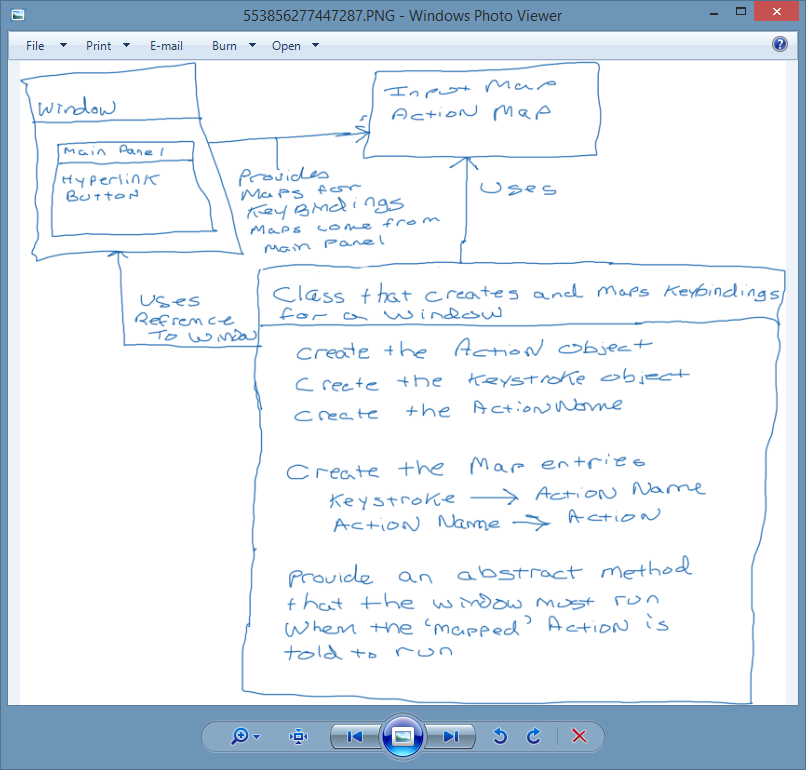
In this demonstration, we're looking for a photograph of a crude software model sketch. The model was showing how combinations of keystrokes such as CTRL + S could be used to activate database tasks, instead of having to click on hyperlinks.
None of these memories have anything to do with the image's file name or path, and that information is not needed anyway, because we're not using a highly restrictive Operating System File Manager to locate and load this file.
Type Your Keywords Into The Search Panel And Click The Search Hyperlink To See A List Of Matching Records
To find the file we're looking for we type the keywords, 'keystroke combinations' into the keyword search panel at the bottom of the window's list of records, then click the Search hyperlink to see what records are a match.
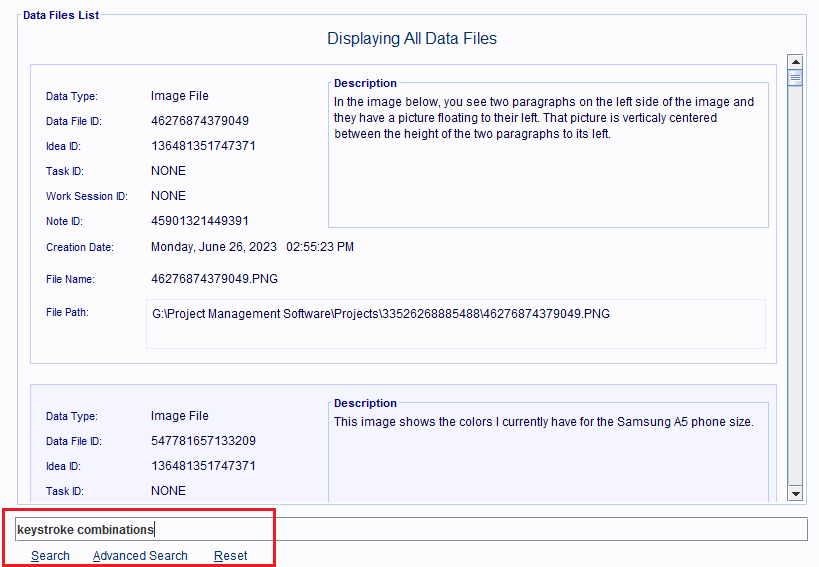
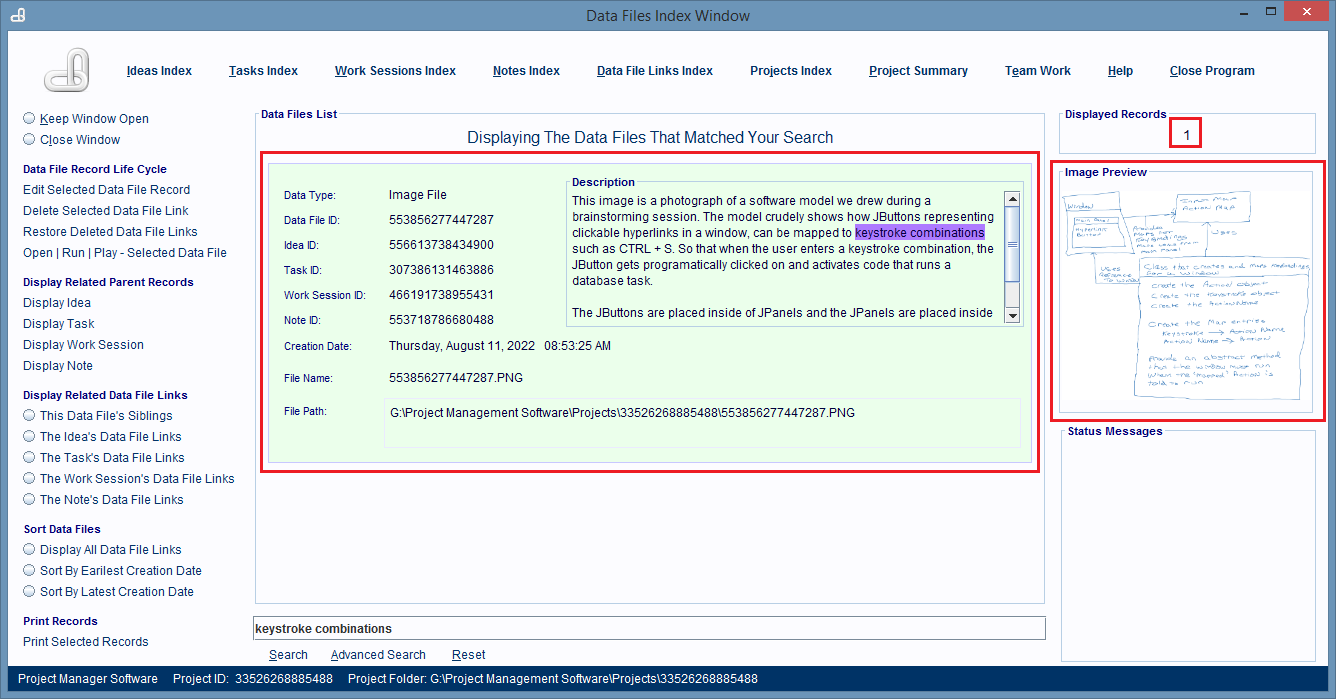
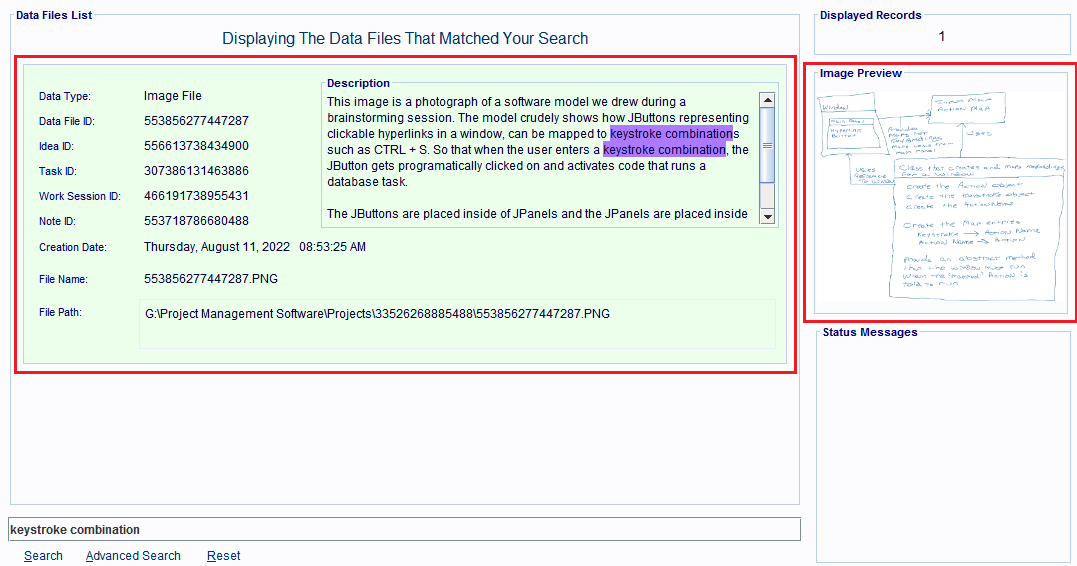
The search finds the record we're looking for.
Single clicking the record allows it to display a small version of the image inside the file, on the right hand side of the window.
When we see that image, we realize that it's the one we're looking for.
We'd Never Have Found This File Easily With A Computer's File Manager
If you look at the file's name and path information in the Data File Link record you'll see that it has nothing to do with the keywords 'keystroke combinations'.
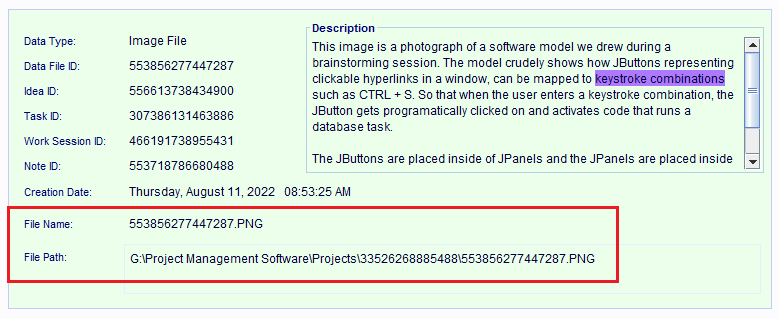
If you had opened your computer's file manager and tried to use those keywords to search for that file you would never find it. Worse, how long do you think you could remember any part of this file's name or path information?

Managing & Locating Files This Way Is Superior To Using An OS File Manager
Here's the beauty of linking files to database records and then using those records to locate and load the files. The records can contain the kinds of things you're going to remember about a file for a long time, as well as all the information the operating system is going to need to find and load them for you.
Your File Management System can't organize files that way. It works on combinations of file and folder names and that's it.
Just Double Click On A Record Entry To Display Its Database Record, Note, Or Computer File's Contents
After you've found the record you're looking for in the 'index' window you're probably going to want to load it and to do that all you have to do is double click anywhere on the record's entry.
If the record is linked to a computer file, then double clicking on it is going to tell the Operating System to open the software that works with that type of file, and it tells it to load and display the file.
So when we double click on the Data File Link record we've been looking at, the computer I'm working with tells the Windows Photo Viewer software to load and display the image file.
Summary
To search for any record, note, note contents, or computer files:
- Open the appropriate Index Window for the type of record you're looking for.
- In the window's Search panel, enter any keywords, or fragments of keywords, that you think are found anywhere inside the record.
- Click the Search hyperlink and a list of matching records is displayed.
- Locate the record you're looking for and double click on its record entry to display it.
If it's linked to a computer file, the file's contents will be loaded and displayed to you by the software that works with that kind of data on your computer.
If you're searching the contents of a Note, then your keyword search will take you to the first location where that content is found inside the note.
Using The Notes System
Every time I work on something, and especially on overcoming difficult problems, I learn important things and I want to capture that knowledge for future use. I use this software for everything I develop and have it running while I'm 'coding'.
So, being able to rapidly and easily capture information about problems and their solutions, and then have that information linked to its relevant part of the, is incredibly valuable for me, and anyone else that can benefit from that knowledge.
The Notes System uses Note records to capture any kind of information you want to record. Inside a Note record the information is stored as combinations of text and/or images. Note records can be linked to any type and amount of computer files, which extends their ability to capture and manage any kind of information you want them to.
Note records are always linked to some combination of records made up of Idea, Task, and Work Session records, and that group is always representing some part of the development of an idea.
When they get linked to these records, these records have easy access to the contents inside those notes, and it's easy to navigate from them and into a note connected to them.
That link also makes it extremely easy to find a note, when all you remember about that note is some small fragment of what's inside of it and/or what part of the project it might be linked to. Using just that information and a simple keyword search, you'll typically find exactly what you're looking for in under 30 seconds.
Look At How Easy It Is To Find And Load A Note
Let's look at how easy it is to find and display the note being displayed above by using a simple keyword search on all the Note records in a database.
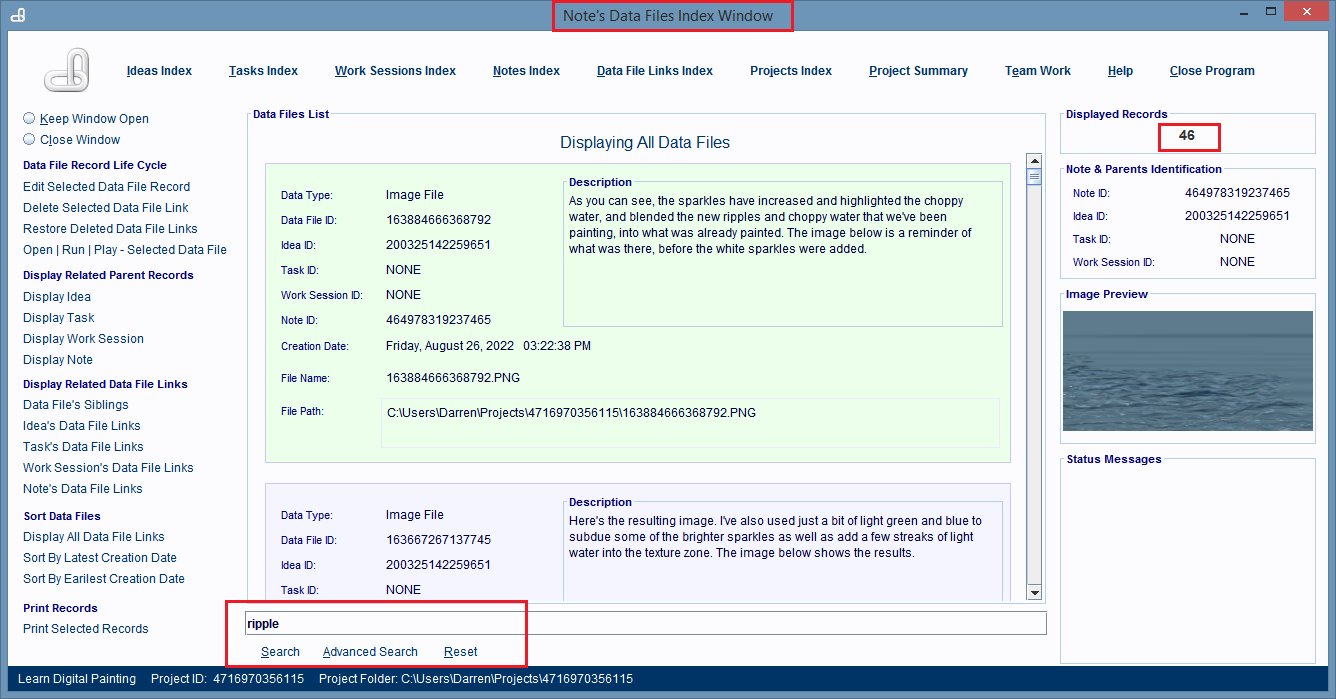
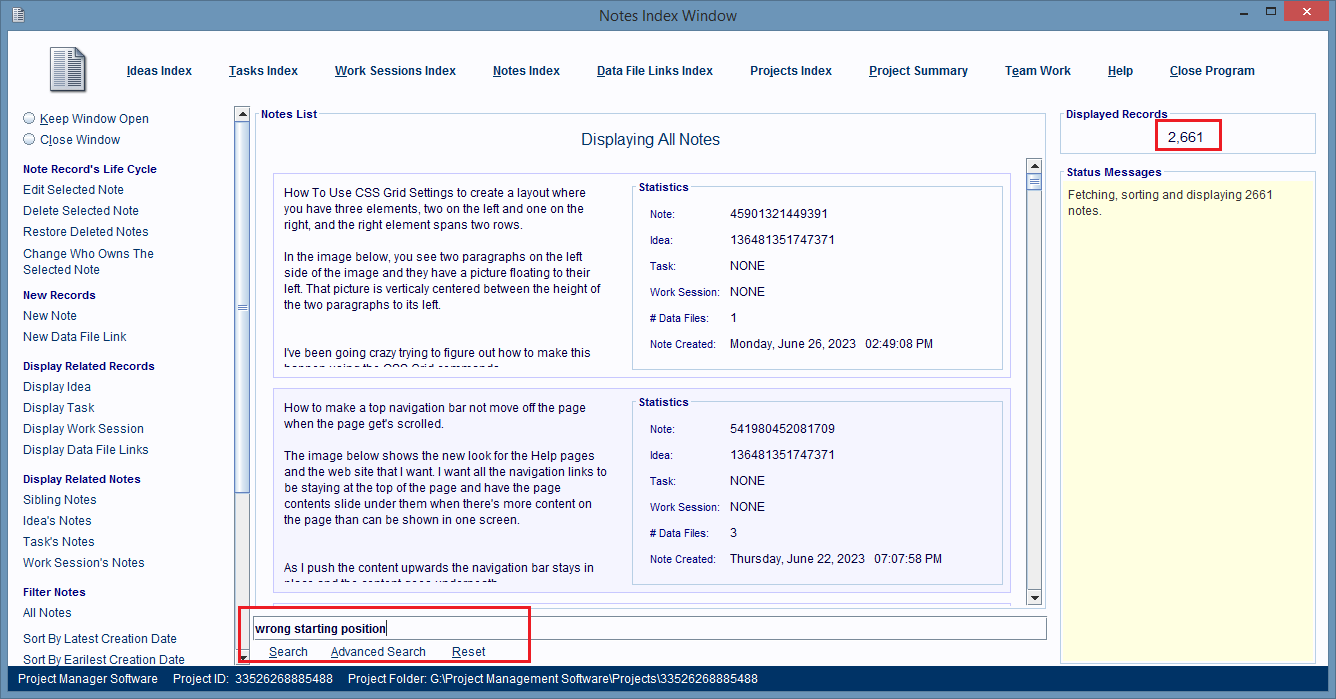
1. At the top of the window we're in, we click the Notes Index hyperlink to get a list of all the Note records in a project.

2. The Notes Index Window opens and we see that there are 2,661 notes in the database.
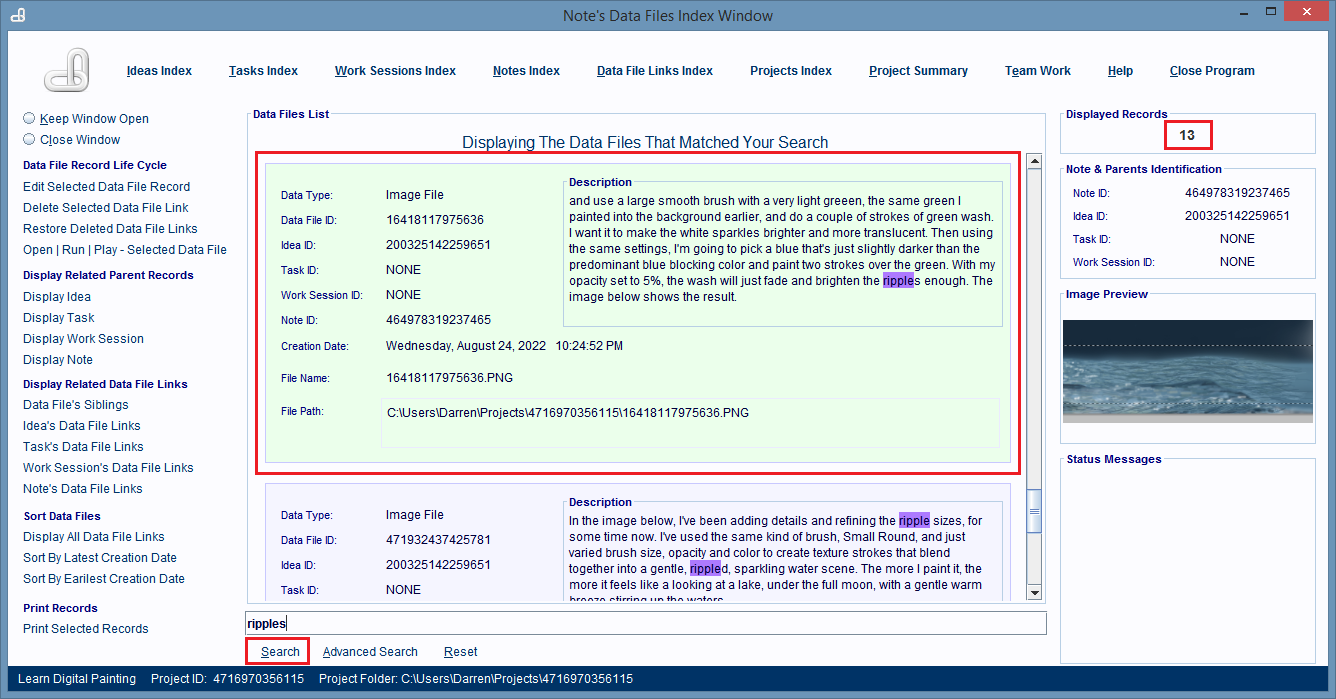
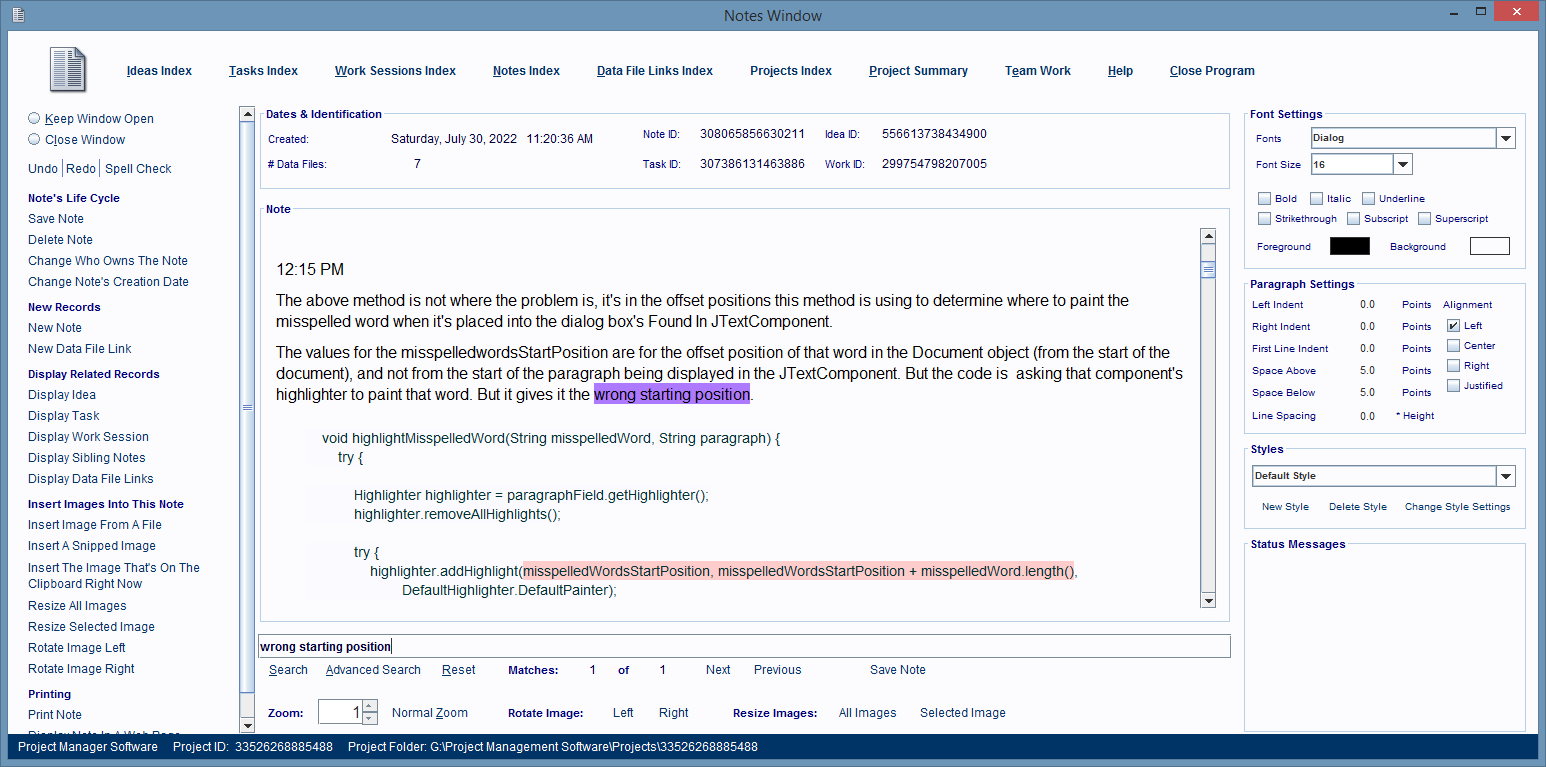
Now all we need to do is enter some very vague keywords such as 'wrong starting position' into the Search panel in that window, and press the Search hyperlink to see a set of notes that has that phrase somewhere in their contents.
3. The search finds 1 matching record.
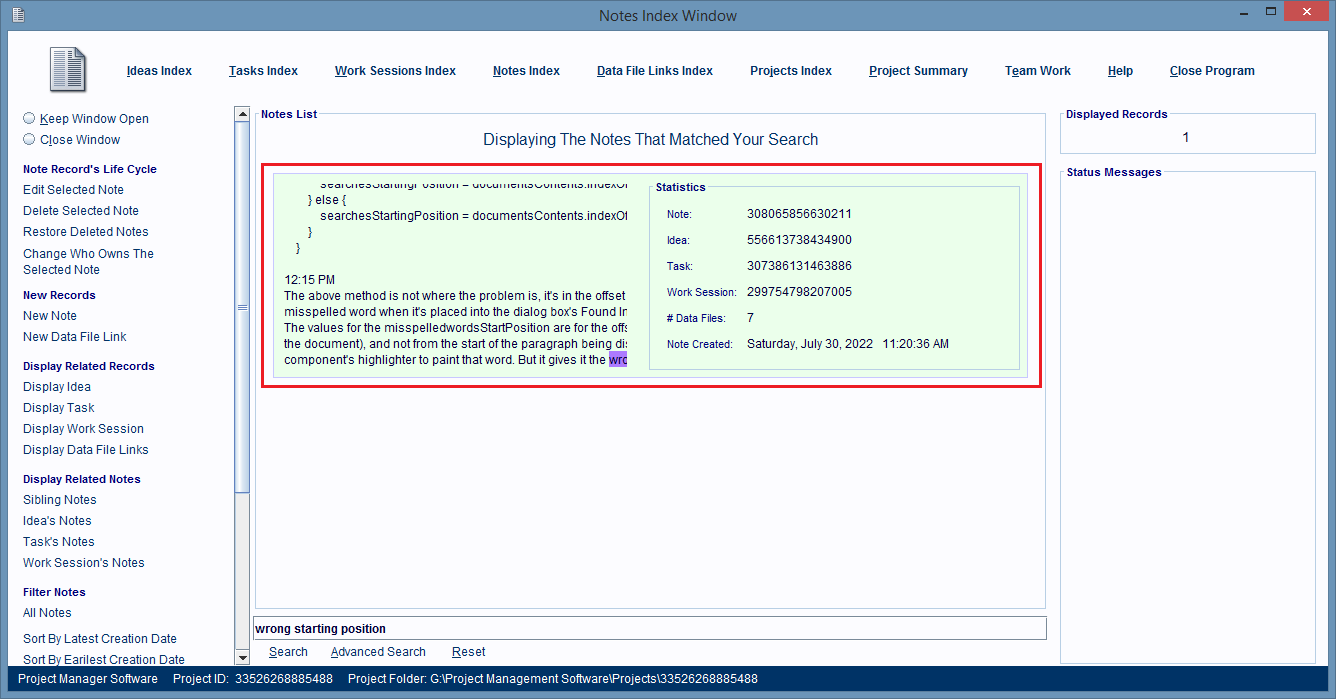
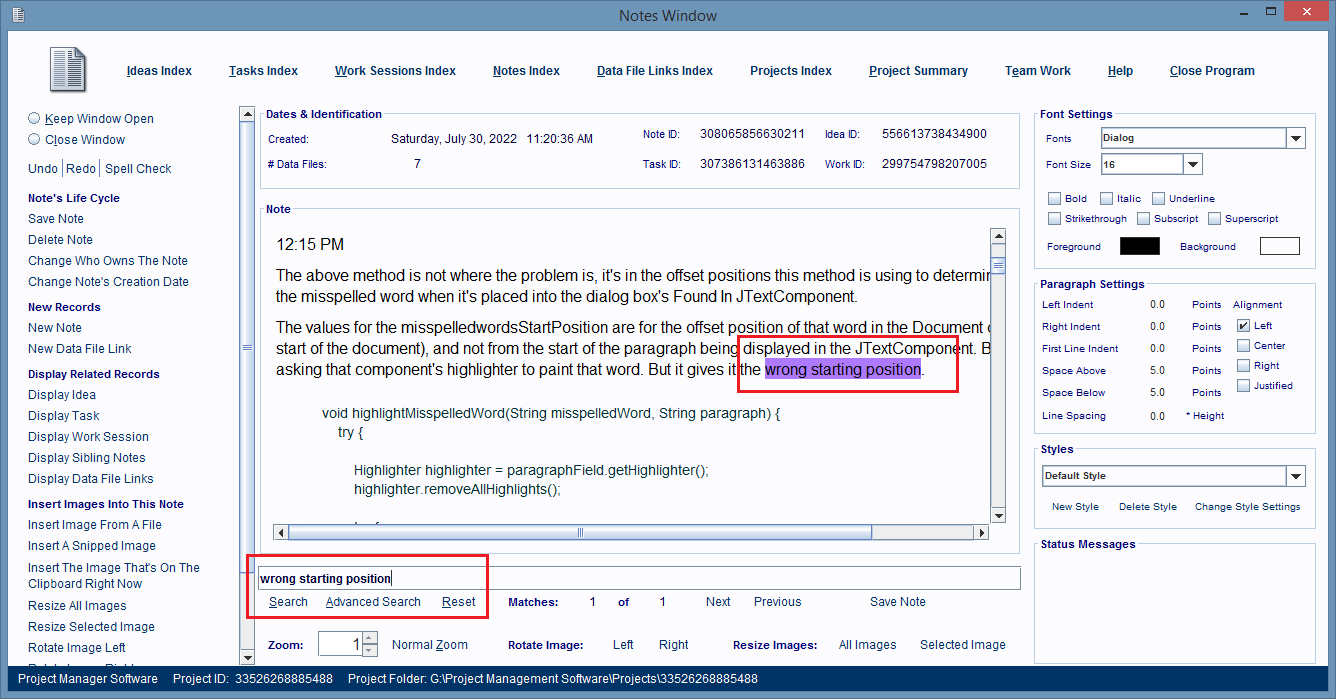
4. Now all we have to do is double click anywhere on the note record (image above) and that note will be displayed in a Notes Window, at the first place in the note, that the search words are found at.
Also, the keywords we searched with, will automatically be placed into the Note Window's search panel.
Creating A Note
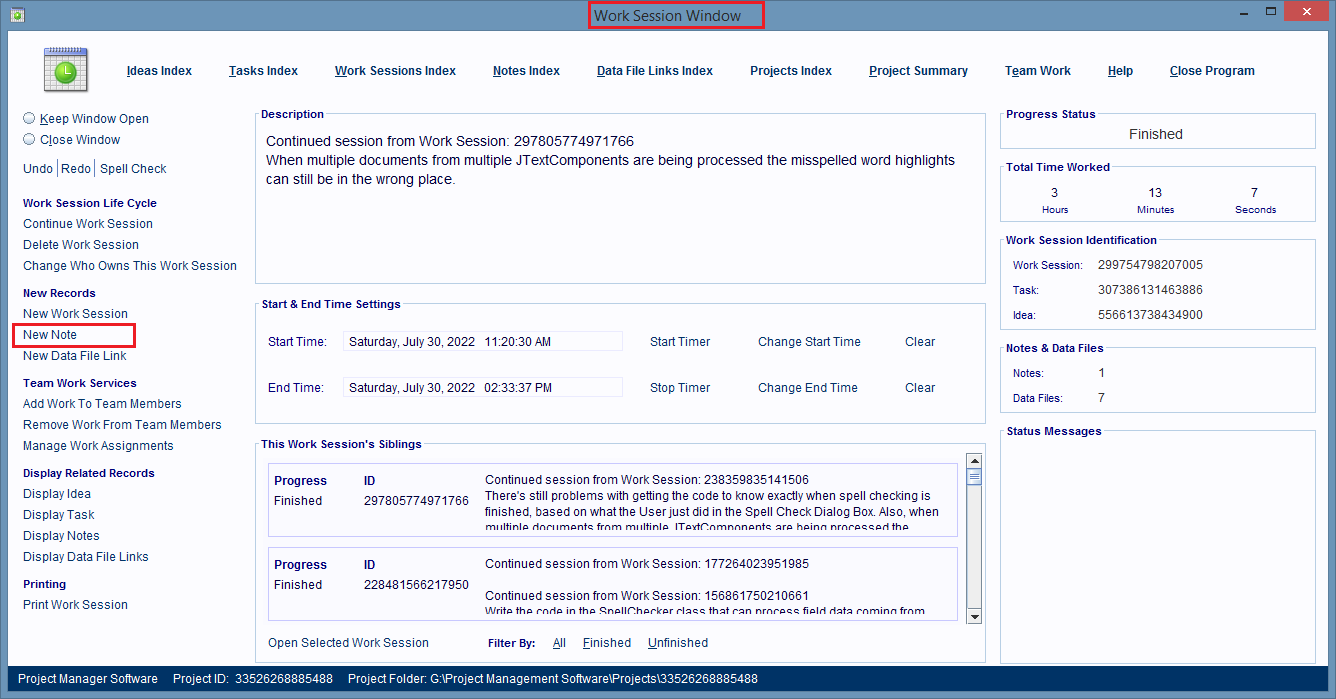
1. To create a Note record all you need to do is be in a window that's working with an Idea, Task, Subtask, Work Session, or Note record first. Then click the New Note hyperlink in that window.
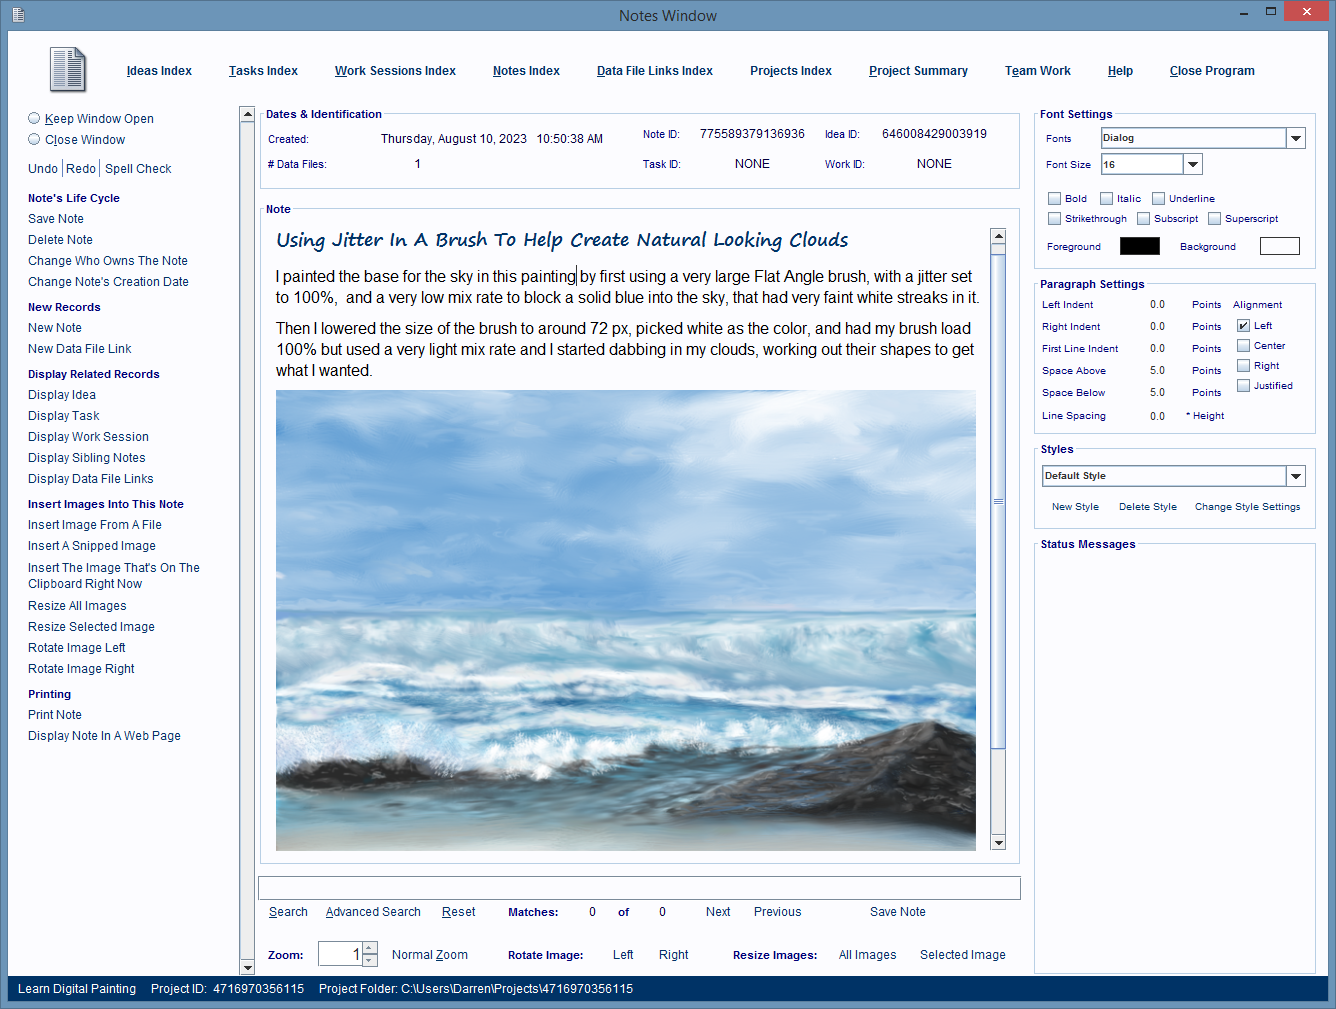
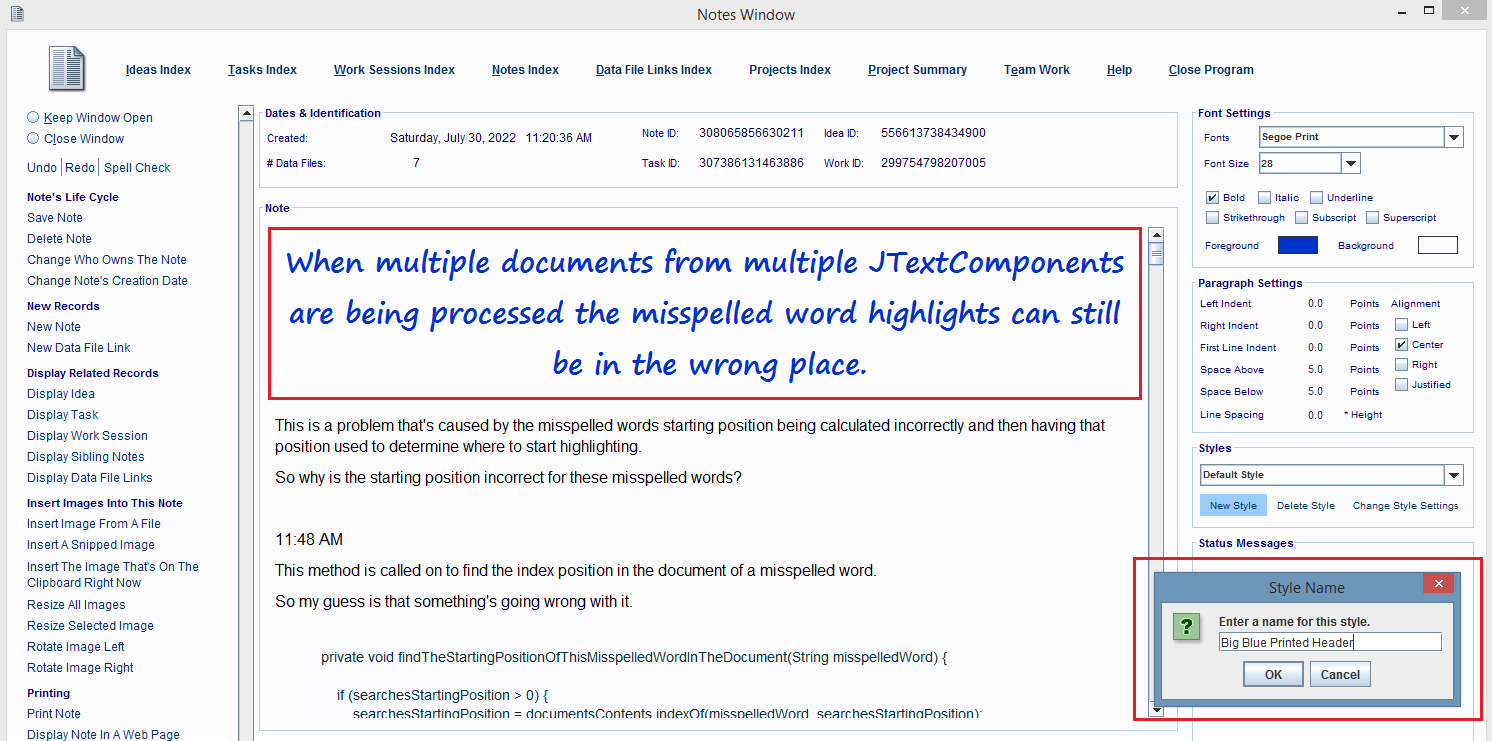
2. The Notes Window is displayed and in the center of the window is where you'll type in the notes contents and insert images.
The Notes Window is a Word Processing system, that has just a small set of features for styling, spell checking, and managing content. But, those features are often more than what you need for a note anyway.
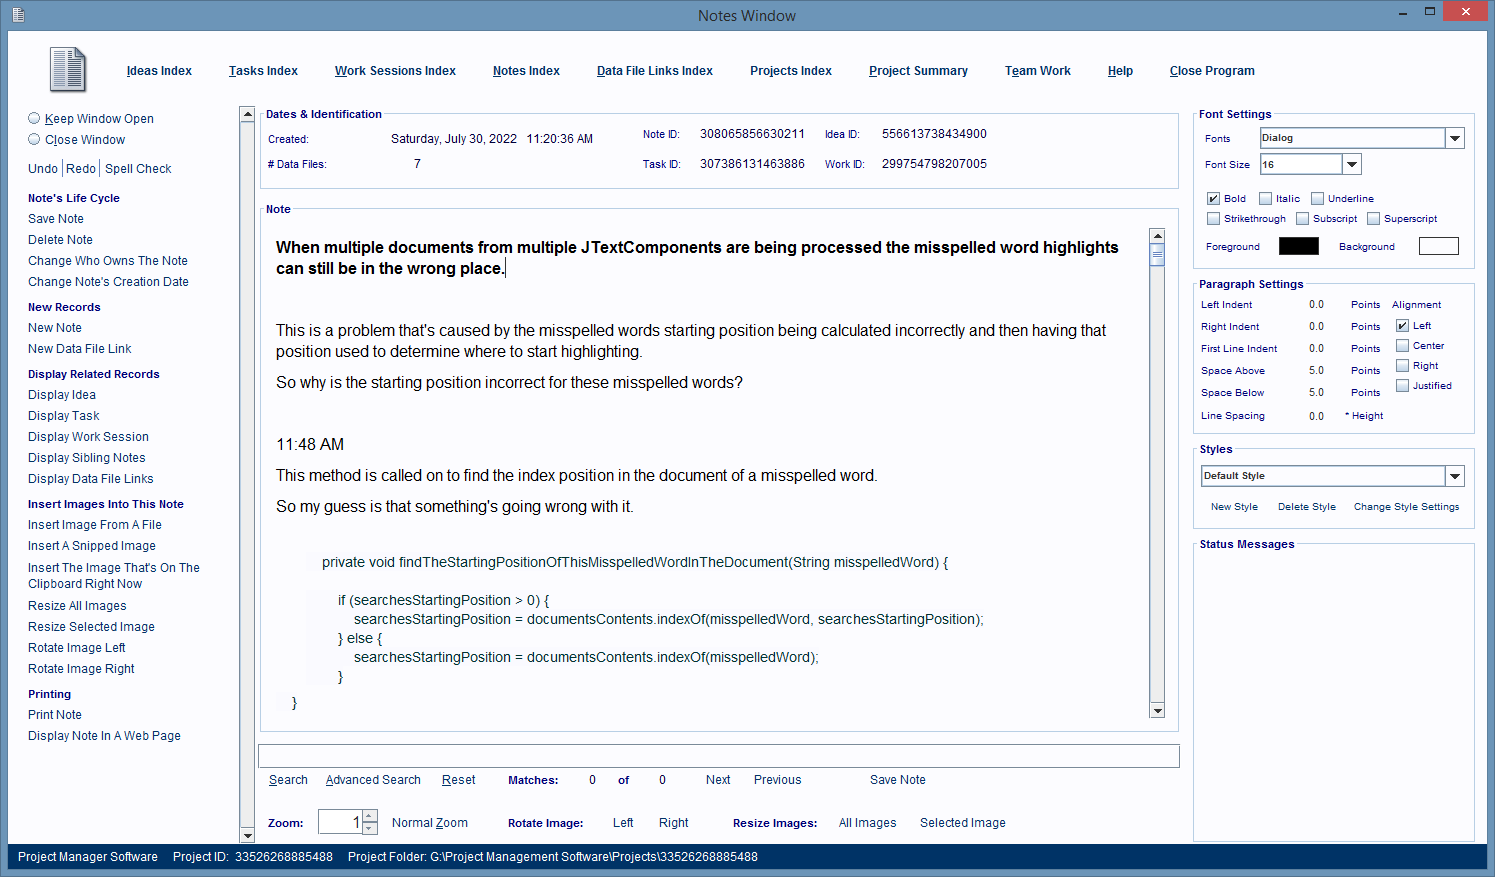
Styling A Note's Contents
On the right hand side of the window, are sets of 'Style Panels' whose components you can click on to change the style settings for the note.
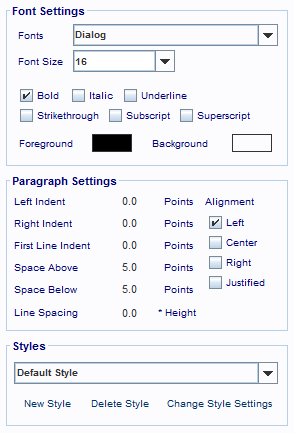
Only the components in the Font Settings panel need you to select the content you want styled first.
If you don't do that then they'll apply their settings to any new text you type at the current cursor location.
The components in the Paragraph Settings panel apply to the paragraph beneath the cursor and new ones you create.
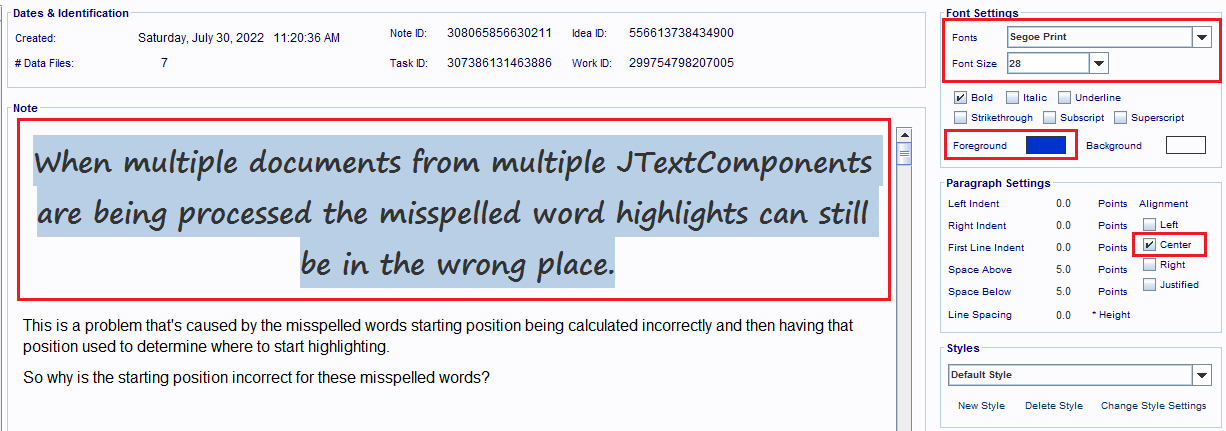
Saving Your Settings To A New Style Object
The Styles Panel's New Style hyperlink lets you save the current combination of settings in the Font and Paragraph Settings panels to a named style. Then in the future you can select text and apply those style settings automatically.
The styles you create are only available to notes in the current project.
Adding Images To A Note
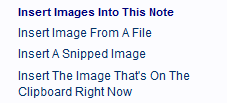
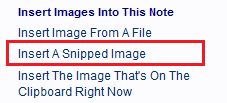
You can add images from files, an image in the computer's clipboard (memory), or by using the software's 'Little Snipper' tool to create screen captures, of something displaying on your monitor. The hyperlinks that you'll use are all on the left hand side of the window, and their names are self-explanatory.
Images are always inserted at the current cursor location and the software automatically creates a Data File Link record to represent their image file, and their relationship to the Note record and all of its parent records.
Inserting Images From A File
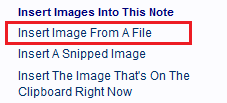
1. Click on the Insert Image From A File hyperlink.
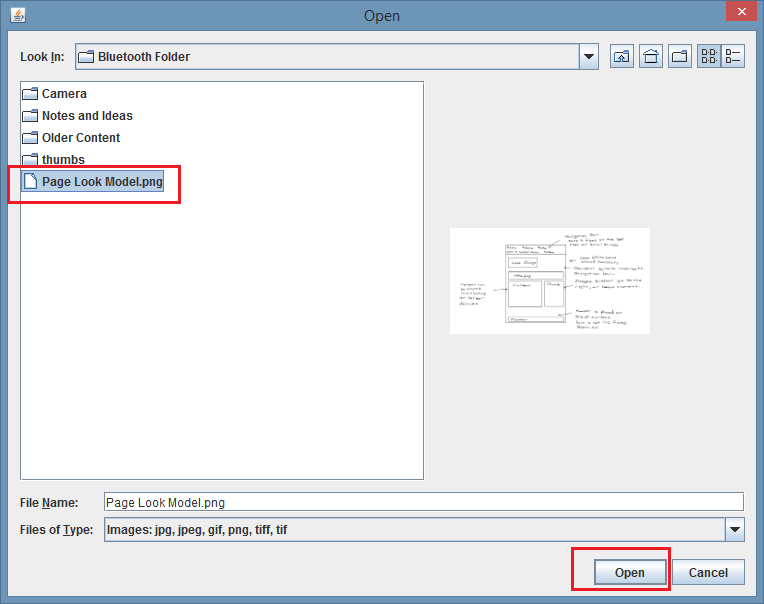
2. A File Navigation dialog box is displayed.
Use it to navigate to and then select the images you want to insert into the note.
Then click the Open button.
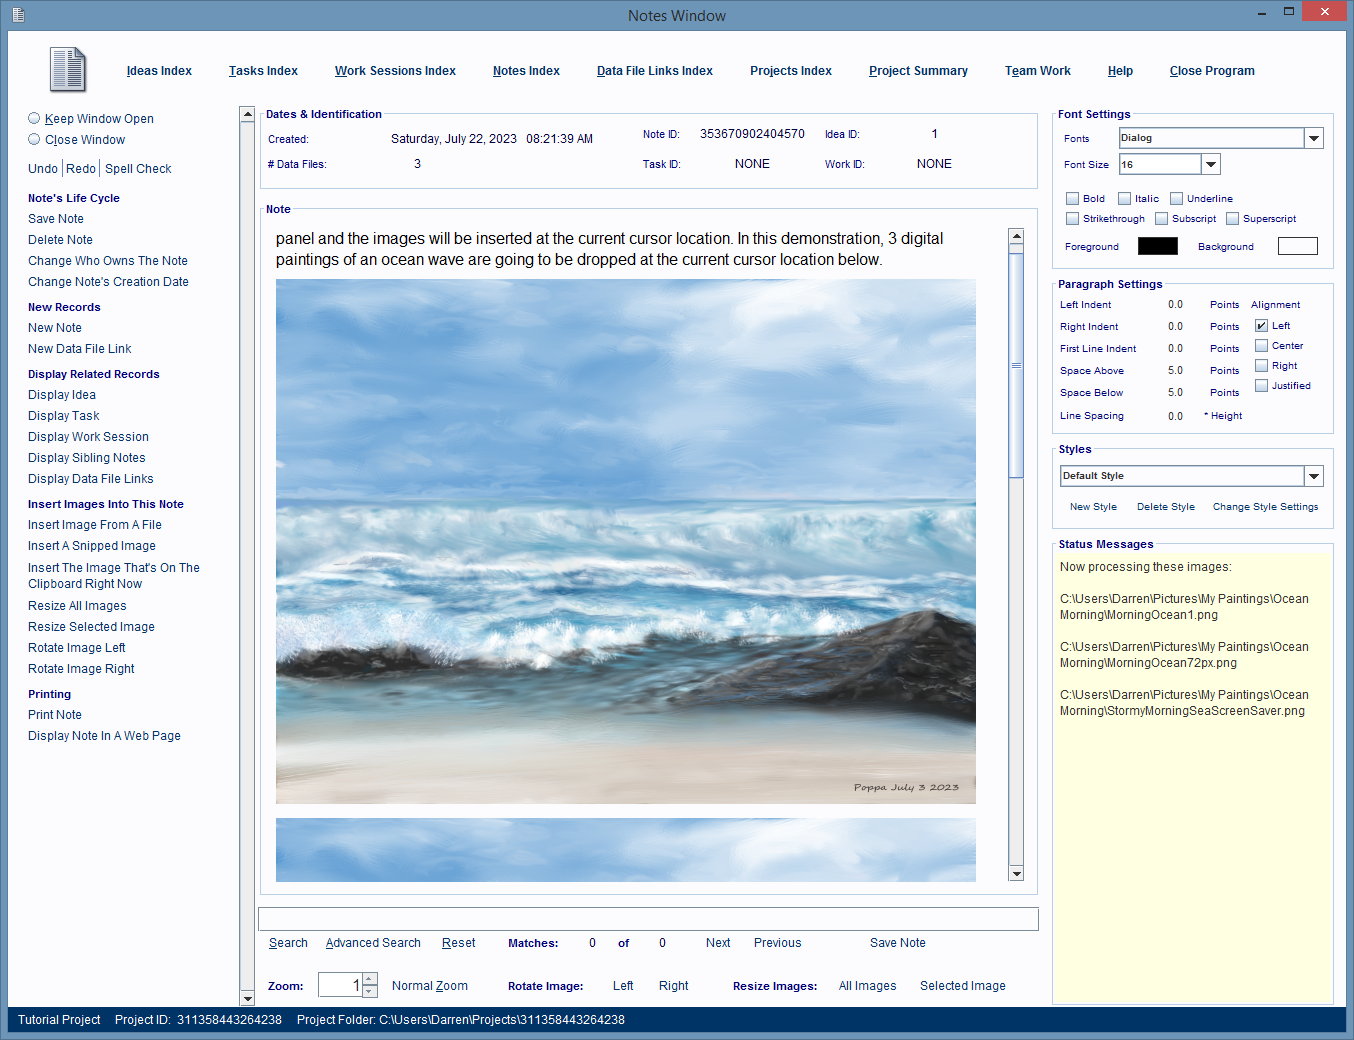
3. The selected images are pasted into the note starting at the current cursor location.
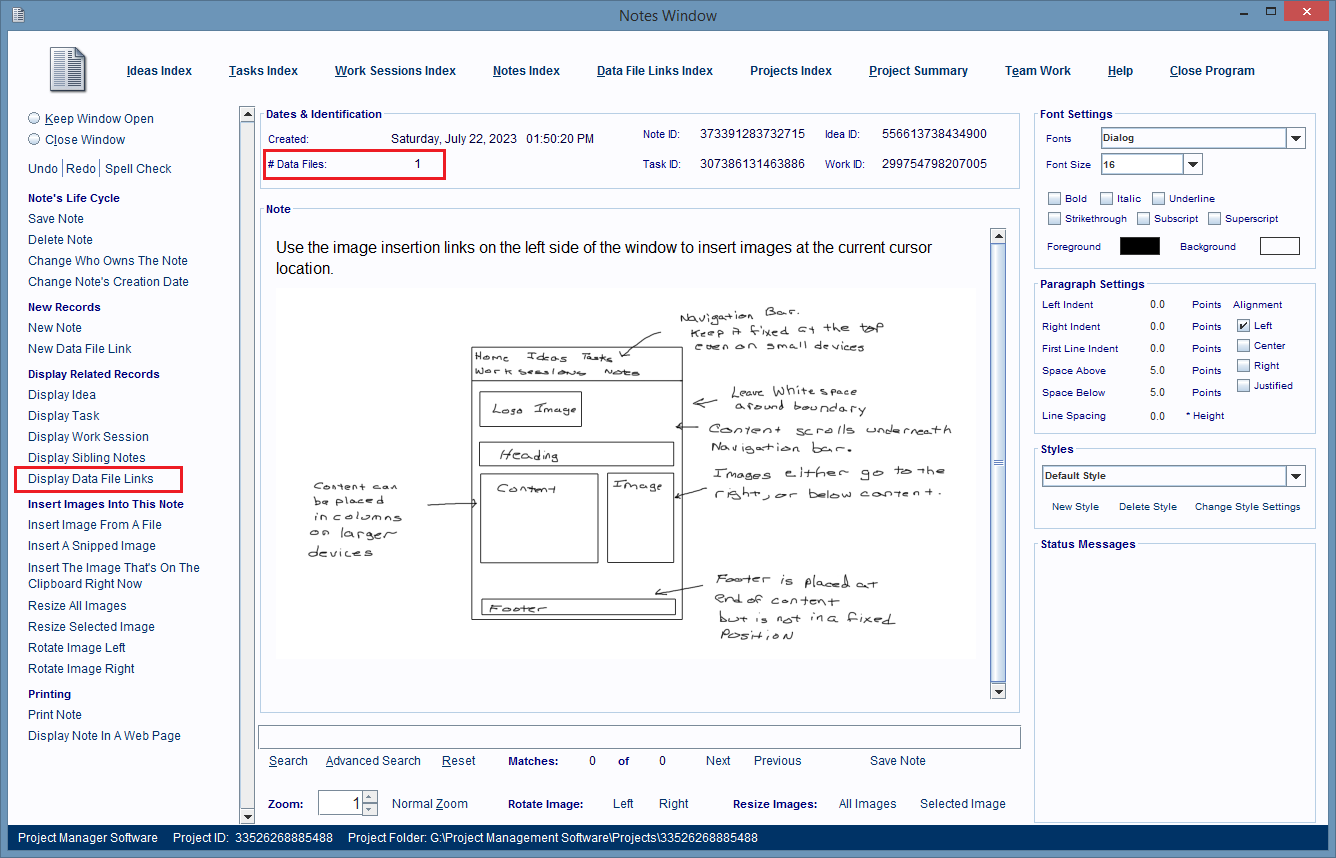
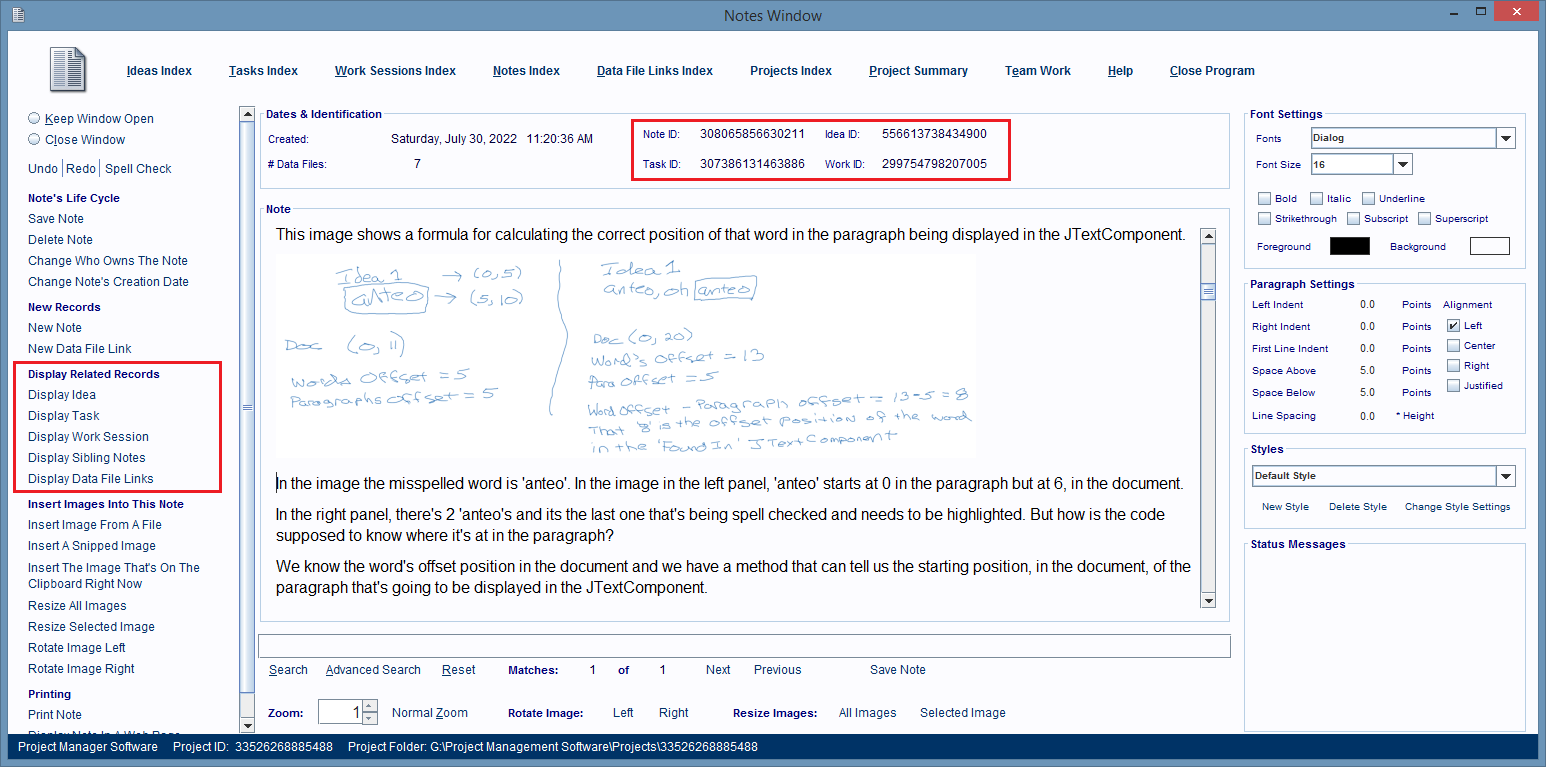
Each image gets its own Data File Link record to represent it and the ones the note owns can be seen by clicking on the Display Data File Links hyperlink (image above).
The Data File Link record's description is the contents of the first paragraph above the image's location in the note.
If you double click anywhere on a Data File Link entry in the 'index' window, then the image file will be opened using the software that processes images in your computer.
On my computer, that software is Windows Photo Viewer, and the image we just added to the note is being displayed in the image below.
You Can Insert Images Into A Note By Dragging And Dropping Them From Your File Manager
You can also insert images from your computer's File Manager software by using it to select them first, then drag and drop the selected files on top of any part of the center panel in the Notes Window and the images will be added to the note.
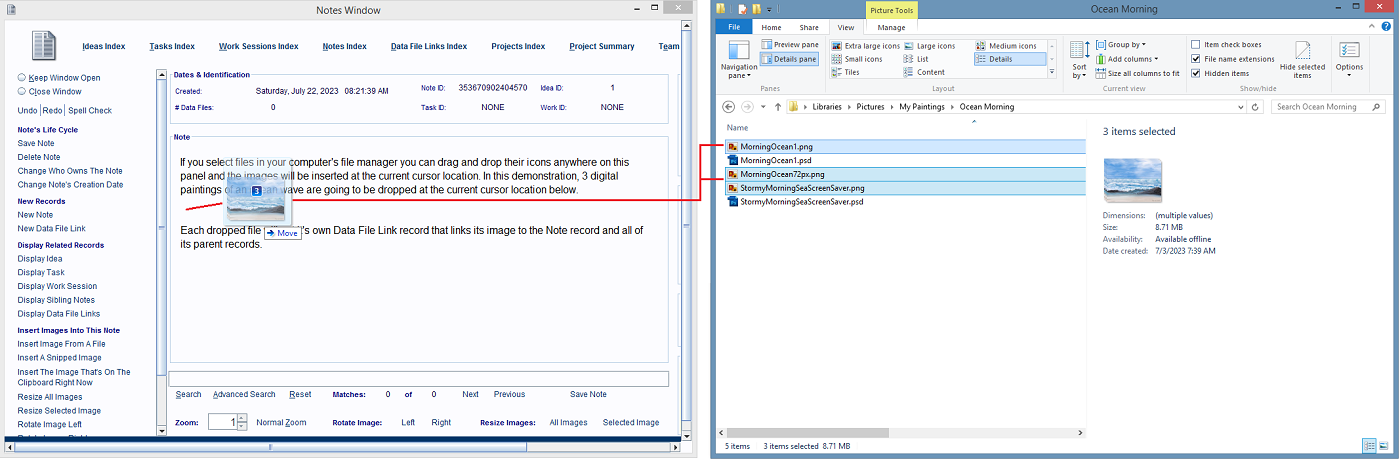
The dragged and dropped files images are inserted into the note.
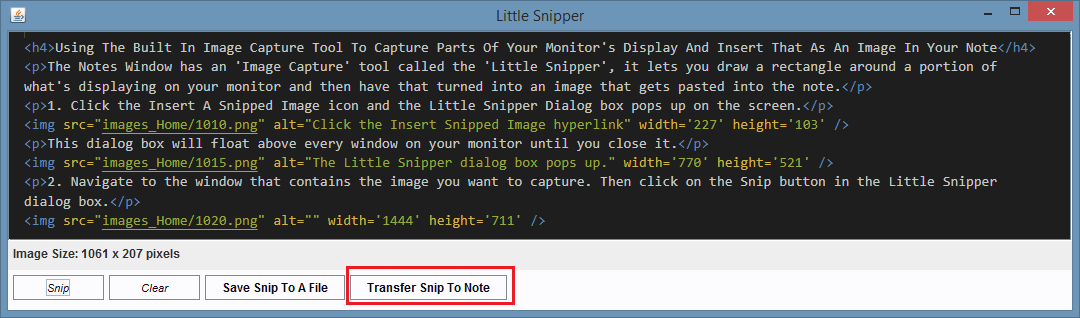
Using The Built In Image Capture Tool To Capture Parts Of Your Monitor's Display And Insert That As An Image In Your Note
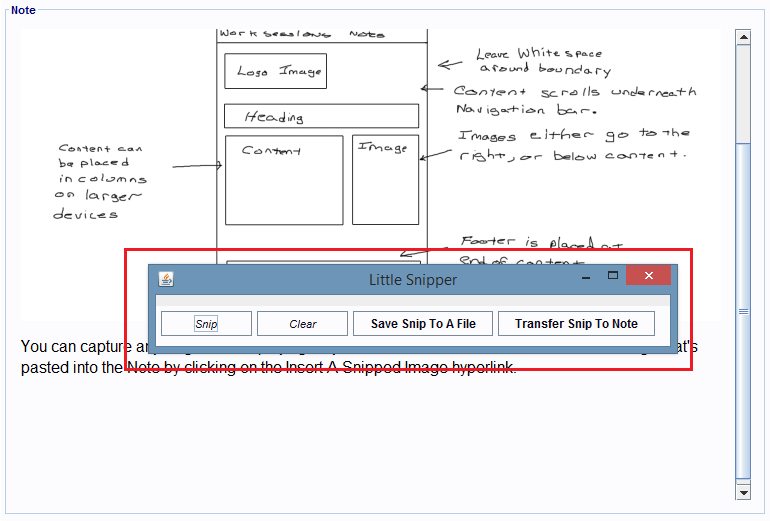
The Notes Window has an 'Image Capture' tool called the 'Little Snipper'. It lets you draw a rectangle around a portion of what's displaying on your monitor and then have that turned into an image that gets pasted into the note.
1. Click the Insert A Snipped Image hyperlink and the Little Snipper Dialog box pops up on the screen.
This dialog box will float above every window on your monitor until you close it.
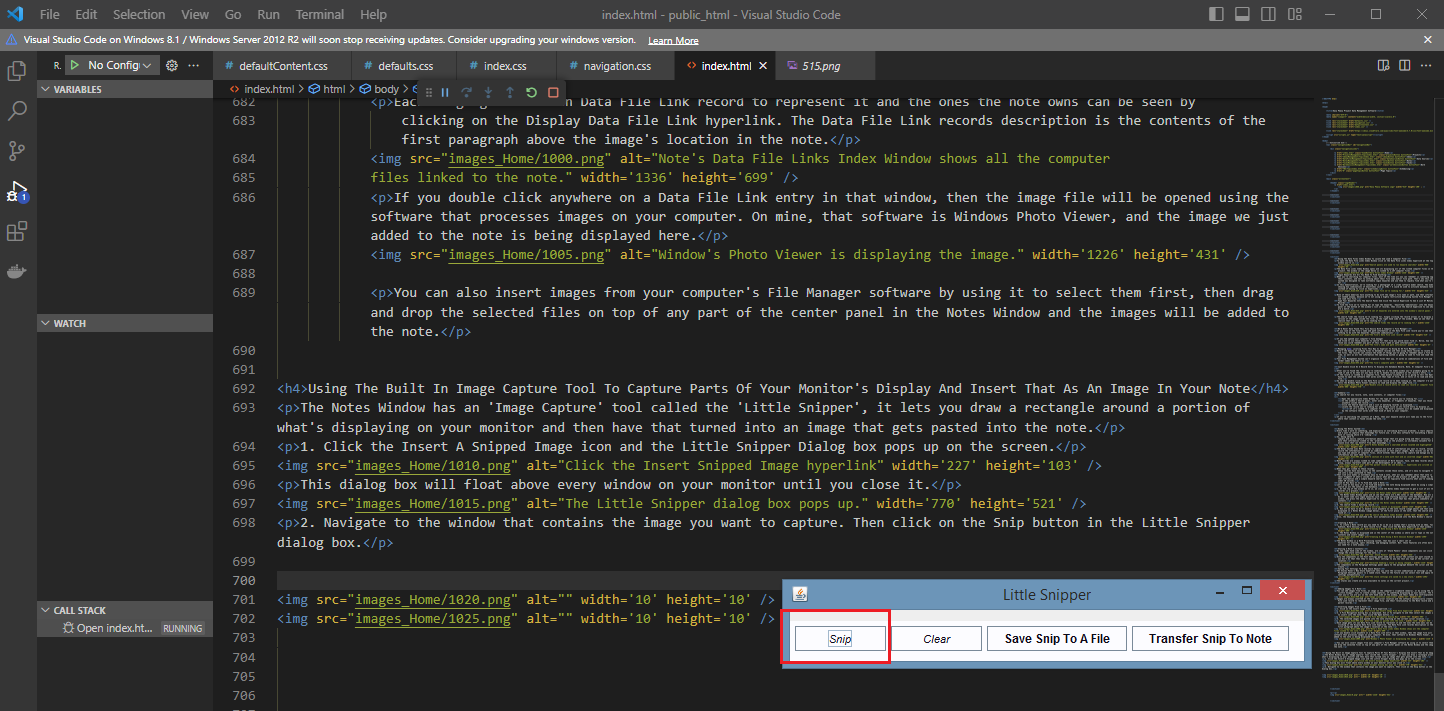
2. Navigate to the window that contains the content you want to capture and put inside an image.
Then click on the Snip button in the Little Snipper dialog box.
3. The cursor turns into a 'Crosshair Cursor', now all you need to do is position that cursor in the upper left corner of the content you want to capture.
Then, hold the left mouse button down as you drag diagonally towards the lower right corner of the content you're capturing.
As you drag, a red box is drawn around the content.
4. When you get to the lower right corner, release the left mouse button. An image of what you selected will be displayed inside the Little Snipper dialog box.
If you like what you see, then click the Transfer Snip To Note button and the image is pasted into the note.
Also, a Data File Link record is created and linked to the image file the dialog box just created for you.
5. The dialog box closes and when you return to the Notes Window, you'll see the snipped image in the note.
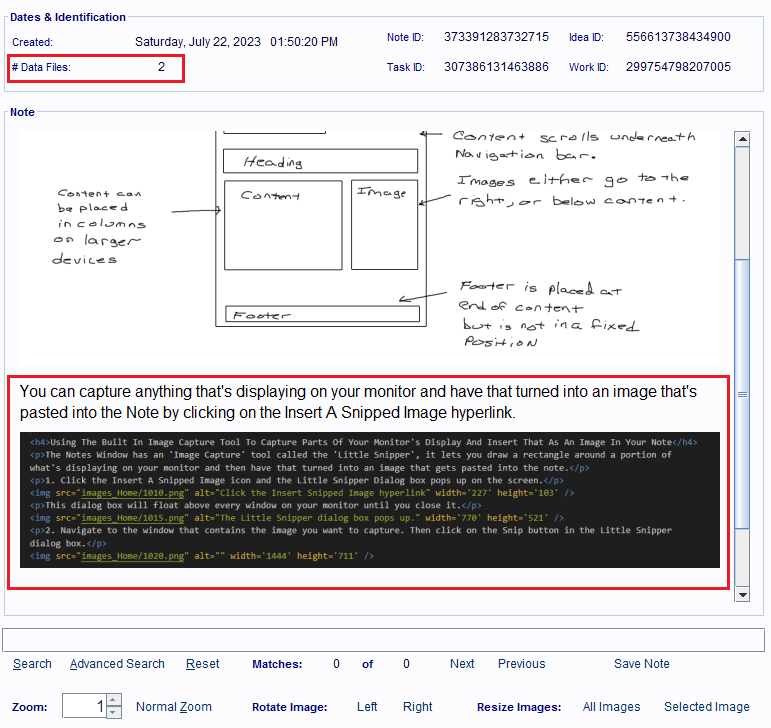
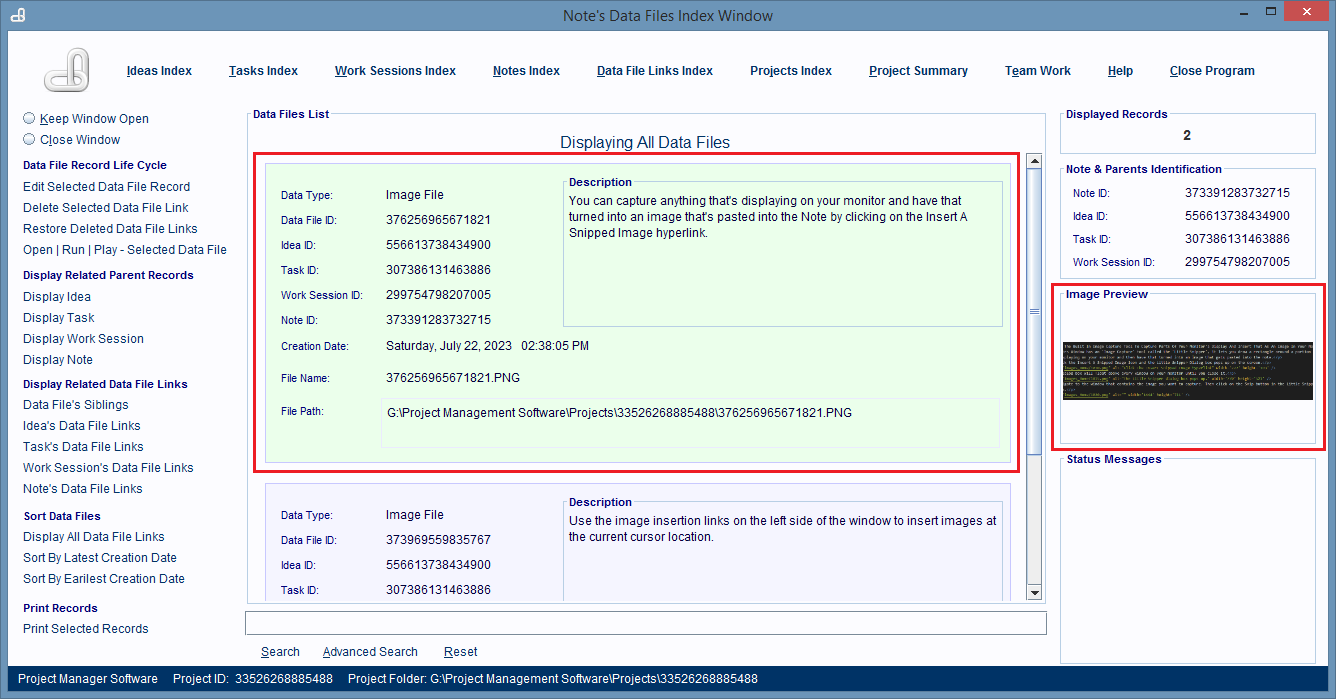
If you click the Display Data File Links hyperlink, you'll see that the snipped content is inside of its own image file and that there's a Data File Link record for it.
You Can Easily Paste Clipboard (In-Memory) Images Into A Note
1. If you cut or copy an image into the computer's clipboard (memory) like the image below.
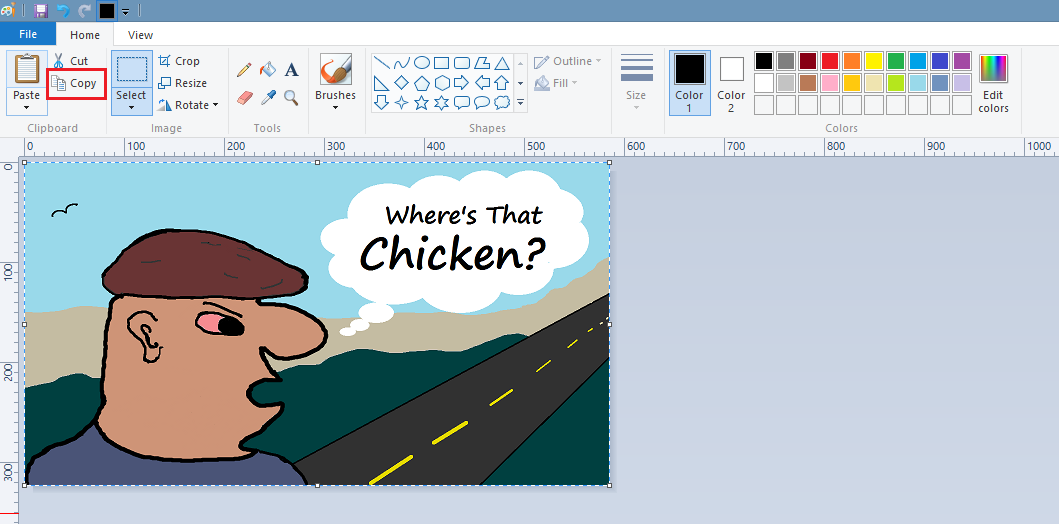
2. Then that image can be pasted into the note by clicking on the Insert The Image That's On The Clipboard Right Now hyperlink. I know, it's a huge hyperlink name, but its purpose is clear.
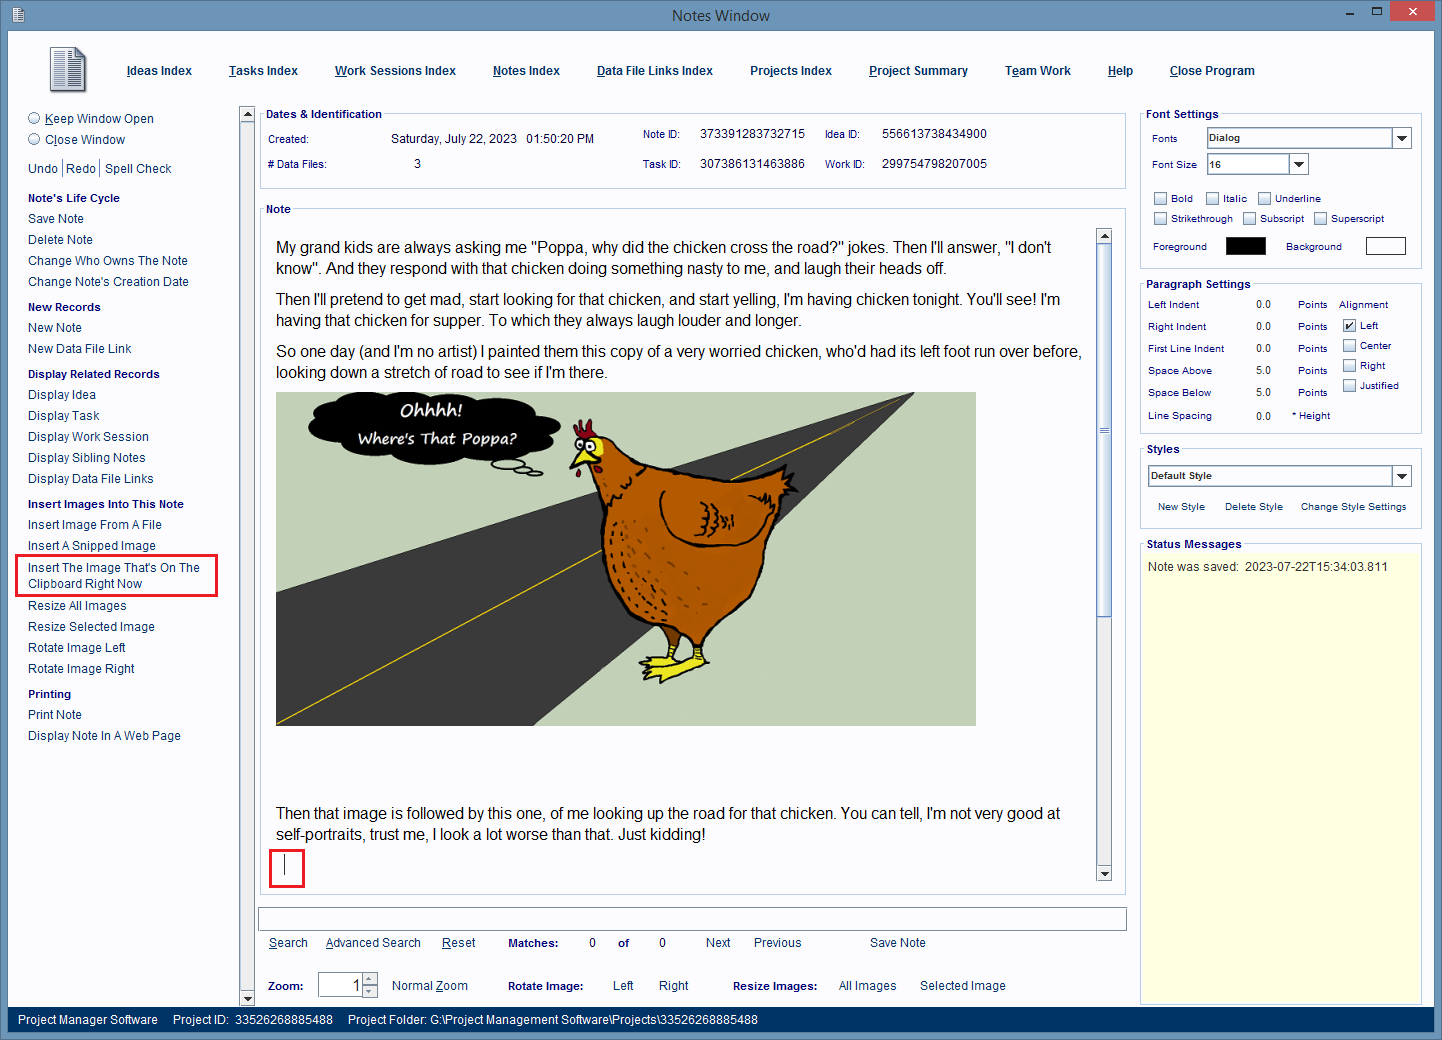
2. The image in the clipboard will be pasted into the note, turned into an image file, and have a Data File Link record representing it.
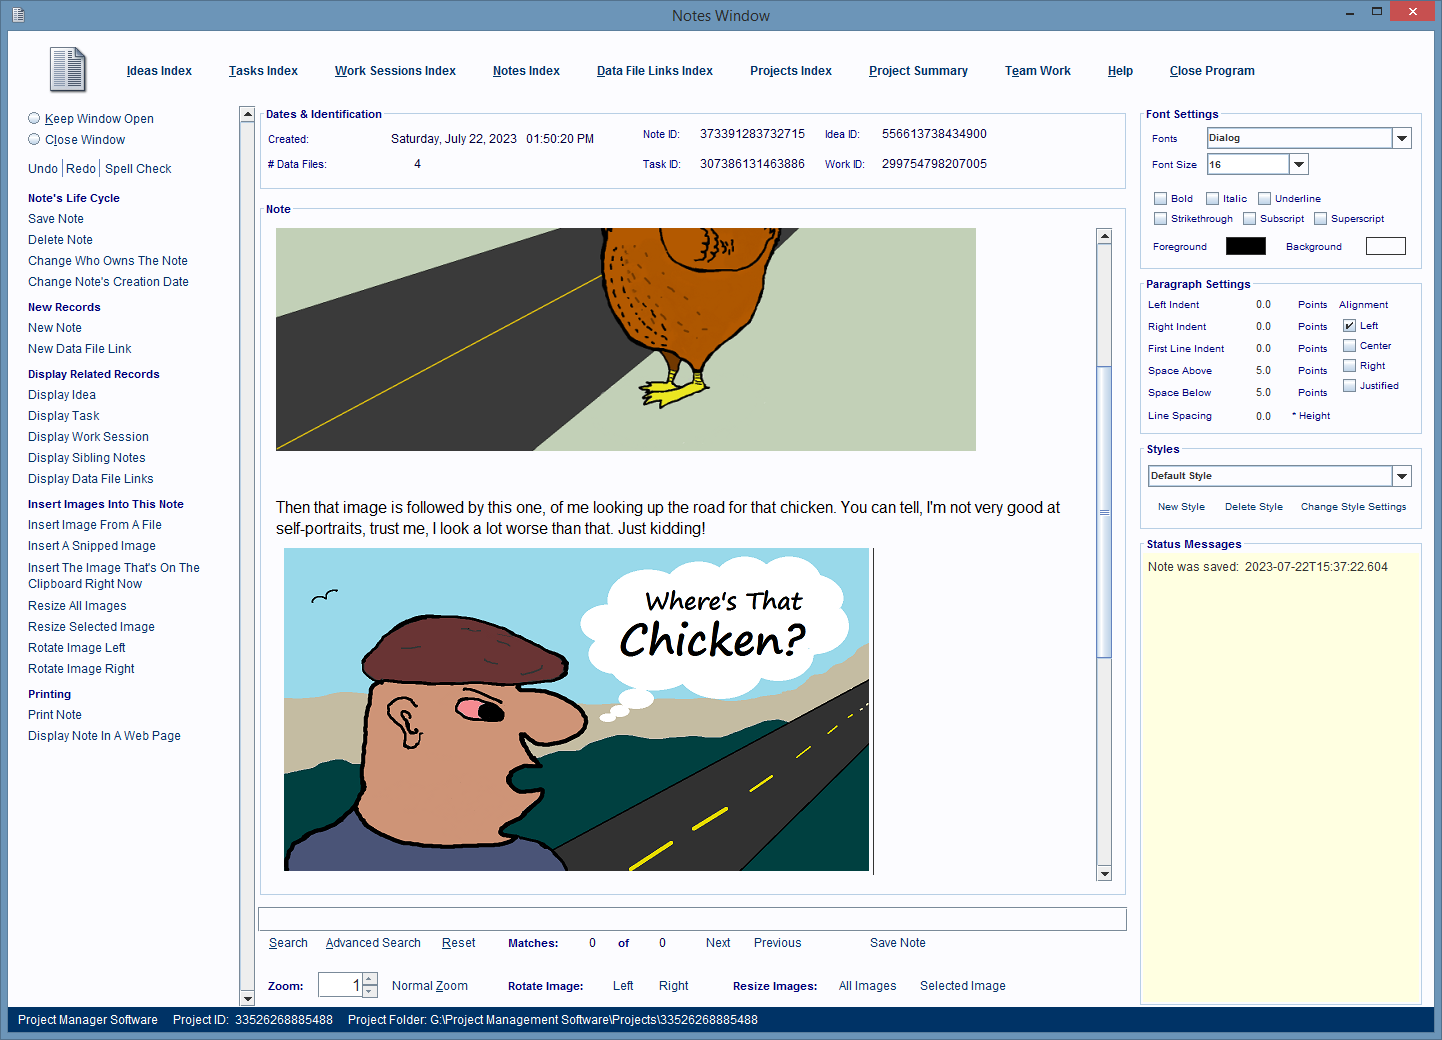
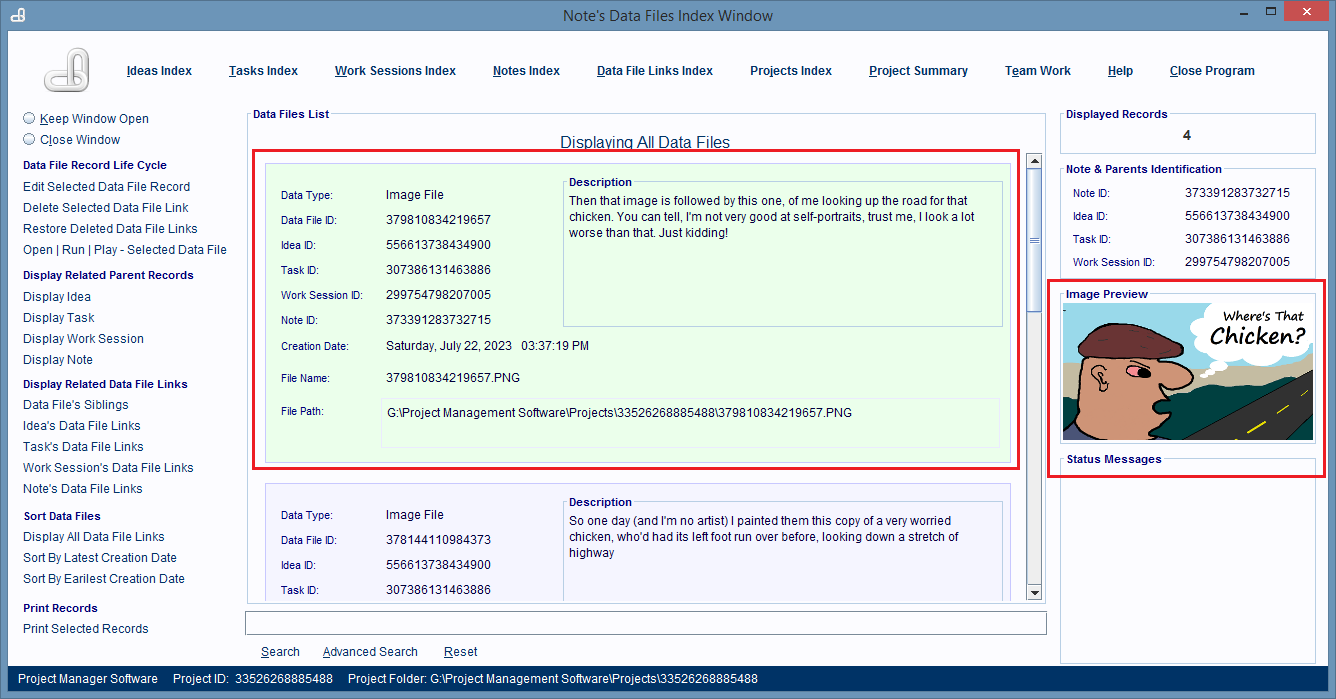
This is the Data File Link record for the pasted image.
Software Summary
If you've read everything, or most of the topics above here then you've seen that just about everything you need to do to use this software just involves clicking on a hyperlink and then typing information into one or more fields, or scanning a list of records for the ones you're looking for.
You've seen that the databases make it extremely easy to create and use database records to represent anything related to any project, and the database automatically performs complex database operations for you, so you never have to know anything about database design or programming, like you do with traditional database systems.
You've seen how easy it is to create records that represent people and teams and then link them to work assignments and be able to track who's working on what.
You've seen that finding anything is done quickly and easily using a keyword search and whatever you can remember about what you're looking for.
There's a lot more detailed information on every part of this software on this website, but at this point, you've seen and learned about everything you're likely to use the most.
I'm hoping that what you understand by now is that this is one of the easiest to use Data Management software packages out on the market.
That it's capable of being used by anyone, to help them with anything, and that at the extremely low price of $20.00 per copy, won't break any serious project's budget.